

Tutorials
What Is Arduino? A Complete Beginner’s Guide From Zero
Aug
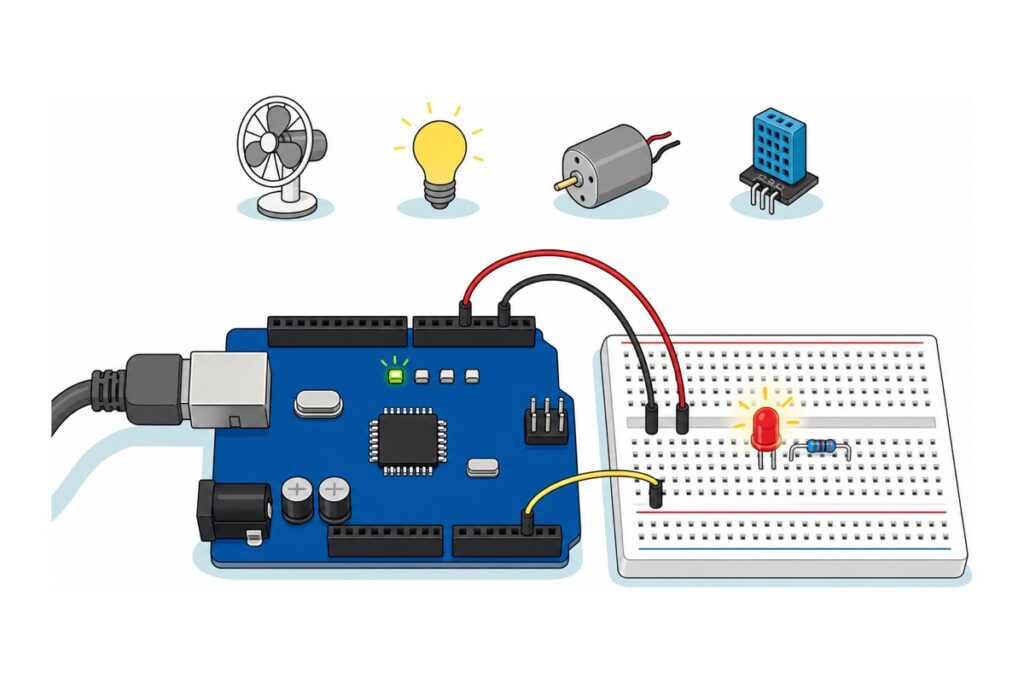
An Arduino is a small circuit board with a single microcontroller chip on it, and that chip runs one program — yours — over and over, from the moment the board gets power. It is not a mini computer — no screen, no Windows, no files. It has one job: read the signals coming in, decide, and switch the voltage on its pins on or off.
This guide answers “what is Arduino” from zero: what the board can and cannot do, whether you need to know coding first, what is inside a starter kit, and a first project for your first week.
What is an Arduino, and how is it different from an ordinary computer?
The Arduino Uno board is built around a single ATmega328P chip, which is a microcontroller and not a computer processor. The difference is not size or speed — the difference is what that chip has to look after.
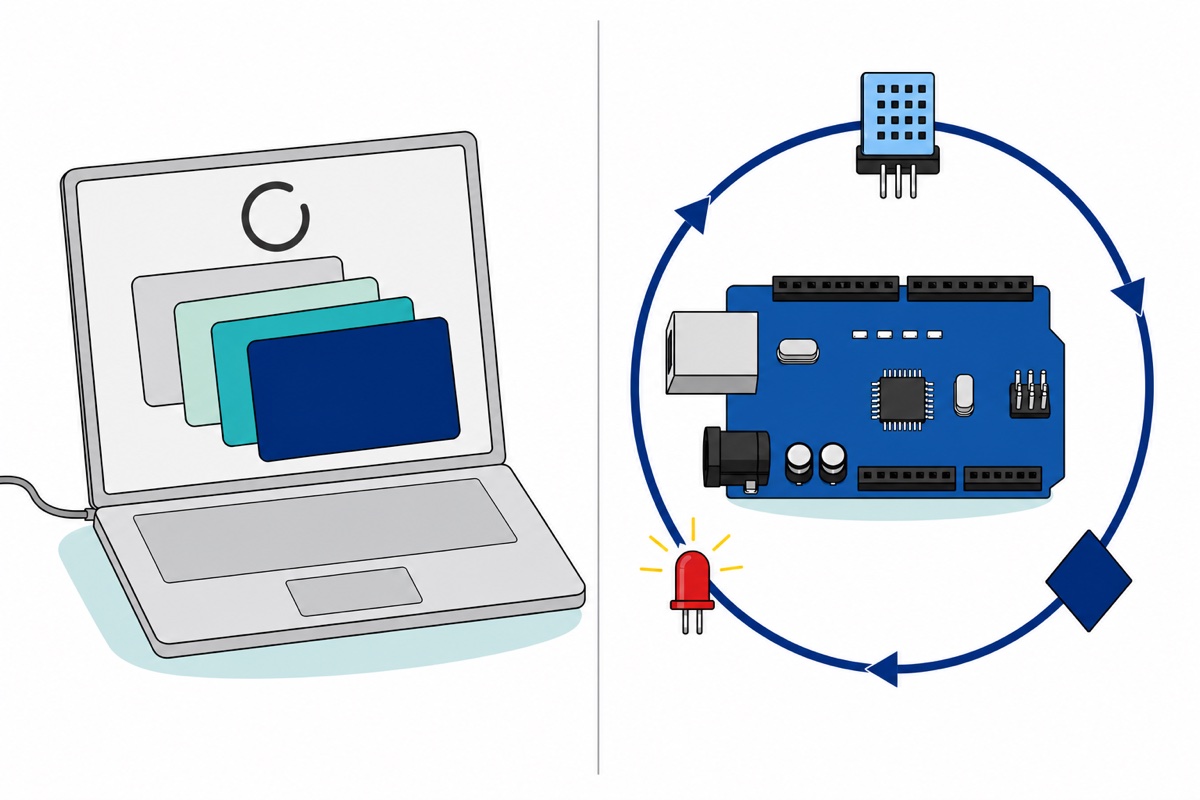
Your laptop runs an operating system. The OS decides which program gets CPU time right now, and that decision changes every millisecond depending on what else is running. Fine for keeping ten browser tabs open, but it means nobody can promise exactly when one particular instruction happens.
The Uno has no OS at all. Your program is uploaded as machine code into the chip’s 32 KB of flash memory, and that is the only code inside it. No scheduler, no other process waiting its turn; so when a line of your code tells pin 13 to go to 5 V, the pin rises within microseconds and nothing can interrupt it.
Two practical consequences follow. First, the board comes alive almost instantly: it runs at 16 MHz with no system to load, so your program starts less than a second after power arrives. Second, it cannot be ruined by a “hang”. Your own code can still stick in a loop with no way out — but press reset, or unplug and replug the power, and the board restarts from the first line: there are no files and no system state to be left half-written.
| Item | Arduino Uno | Ordinary computer |
|---|---|---|
| Programs running | One, forever | Many, scheduled by the OS |
| Operating system | None | Yes |
| Time from power to running program | Under a second | Tens of seconds |
| Working memory | 2 KB SRAM | Billions of bytes |
| Pins that put out voltage directly | 14 digital pins, 5 V | None |
| When power is cut | Starts again clean | Files can be corrupted |
That is why traffic lights, washing machines and remote controls use a microcontroller and not a computer. Not because a computer is too weak — because it is too busy.
What can an Arduino do, and what can it not do?
The Arduino Uno controls things; it does not crunch data. Its fourteen digital pins switch on and off at 5 V, six of them can put out a PWM signal to dim a lamp or adjust motor speed, and six analog pins read varying voltages such as a light sensor’s output (official Arduino UNO R3 specification).
There are two limits, and both are numbers. The first is current, and the number to design with is not 40 mA. That is the ATmega328P’s absolute maximum — a “never exceed” limit, not a target (Microchip datasheet). Arduino’s recommended working figure is 20 mA per pin (official UNO Rev3 specification), and all the pins together must not exceed 200 mA, the limit of the chip’s own VCC and GND legs. A 5 mm red LED through a 220 Ω resistor draws about (5 − 2) ÷ 220 = 0.0136 A, or 13.6 mA — comfortably under 20 mA, and three at once are still only 41 mA of that 200 mA budget. A small DC motor draws several hundred mA, so it must go through a driver module or a relay; wire it straight to a pin and the pin burns out first.
The second is working memory: 2 KB of SRAM, where every variable in your program lives while it runs. Enough for dozens of sensor readings and a few lines of text, but not for images, video or long lists — which is why the Uno does not do face recognition and does not play songs.
| The Uno is good at this | The Uno is not made for this |
|---|---|
| Switching lamps, buzzers and relays by time or condition | Processing images or video |
| Reading temperature, light, distance, buttons and potentiometers | Storing files or a database |
| Controlling motor speed and servo angle through a driver module | Driving motors straight from a pin |
| Devices that must react instantly and never stall | Connecting to Wi-Fi without an extra module |
The Uno also has no Wi-Fi radio inside it. If the project you have in mind sends data to a phone, read the ESP32 vs ESP8266 vs Arduino Uno comparison before you buy.
Everything you need to start from zero
 Arduino Uno Compatible SMD UNO R3 with Type B Cable - ATMEGA328P with CH340G-Microcontroller Project
 MB102 Breadboard 170 400 830 Holes Breadboard Donut Board Arduino Prototype Multi Color - BREADBOARD (400 HOLES)
 40pcs Dupont Wire 10cm 20cm 30cm for Breadboard DIY Experiment Jumper Wire Breadboard wire - DUPONT WIRE M-M 20CM
 Round Head LED 3mm / 5mm / 8mm - Red/Yellow/Blue/Green/White - 5mm LED (RED)
 400 pcs 1/4W Resistor Pack Resistor Kit 20 Common Value with 20 each
This Uno board connects to your computer with a USB Type B cable, the squarish desktop-printer kind. Male-to-male dupont wires are the right choice at both ends: the Uno's headers are pre-soldered female sockets, and a breadboard takes male pins.
Optional: a ready-made box
 Electronic Component Set Beginner Electrical Learning Kit For Arduino Beginner Learning - STARTER KIT WITH UNO R3
 37 in 1 Sensors & Electronic Set Beginner Sensor Learning Kit 37in1 For Arduino Beginner
ELECTU3 is a component set that comes with a UNO R3 board in one box. 37SESET is a 37-sensor set for your second week onwards, after your first LED lights up.
Do you need to know coding before using an Arduino?
No — mainly because every Arduino program has the same shape, so you can take in the whole skeleton at once. Below is Blink, everyone’s first program — Arduino calls one program a sketch. It blinks the “L” LED already fitted on the Uno board, so it runs without a single external component.
// Blink - everyone's first program when learning Arduino.
// The "L" LED already fitted on the Uno board is wired to pin 13,
// so this sketch runs without any external components.

const int PIN_LED = 13;   // change this number if your external LED is on another pin

void setup() {
  // setup() runs ONCE only, the moment the board powers up or is reset.
  pinMode(PIN_LED, OUTPUT);   // pin 13 becomes an output (it pushes voltage out)
}

void loop() {
  // loop() repeats without stopping for as long as the board has power.
  digitalWrite(PIN_LED, HIGH);   // 5 V on pin 13 - the LED lights up
  delay(1000);                   // wait 1000 milliseconds = 1 second
  digitalWrite(PIN_LED, LOW);    // 0 V on pin 13 - the LED goes out
  delay(1000);                   // wait another second, then repeat
}
Those two functions are the entire skeleton of every Arduino sketch you will meet. setup() runs once when the board powers up or reset is pressed, and that is where you tell the board which pins become outputs. loop() runs after it and repeats forever: when its last line finishes, it goes straight back to the first. That is the same loop drawn in the figure above.
The rest is only three kinds of instruction. pinMode sets a pin’s role, digitalWrite switches its voltage between 5 V and 0 V, and delay waits in milliseconds. Change both 1000s to 100 and the LED blinks ten times faster — that is how people really learn Arduino: take a working sketch, change one number, see what happens.
The sketch above uses 924 of the Uno’s 32,256 bytes of program space — 2% of the board, so there is plenty of room to experiment and get it wrong.
What is inside an Arduino starter kit, and what does it cost to start?
An Arduino starter kit is one box holding a board, a breadboard, wires and a handful of small parts such as LEDs, resistors and buttons. It is not the only way in.
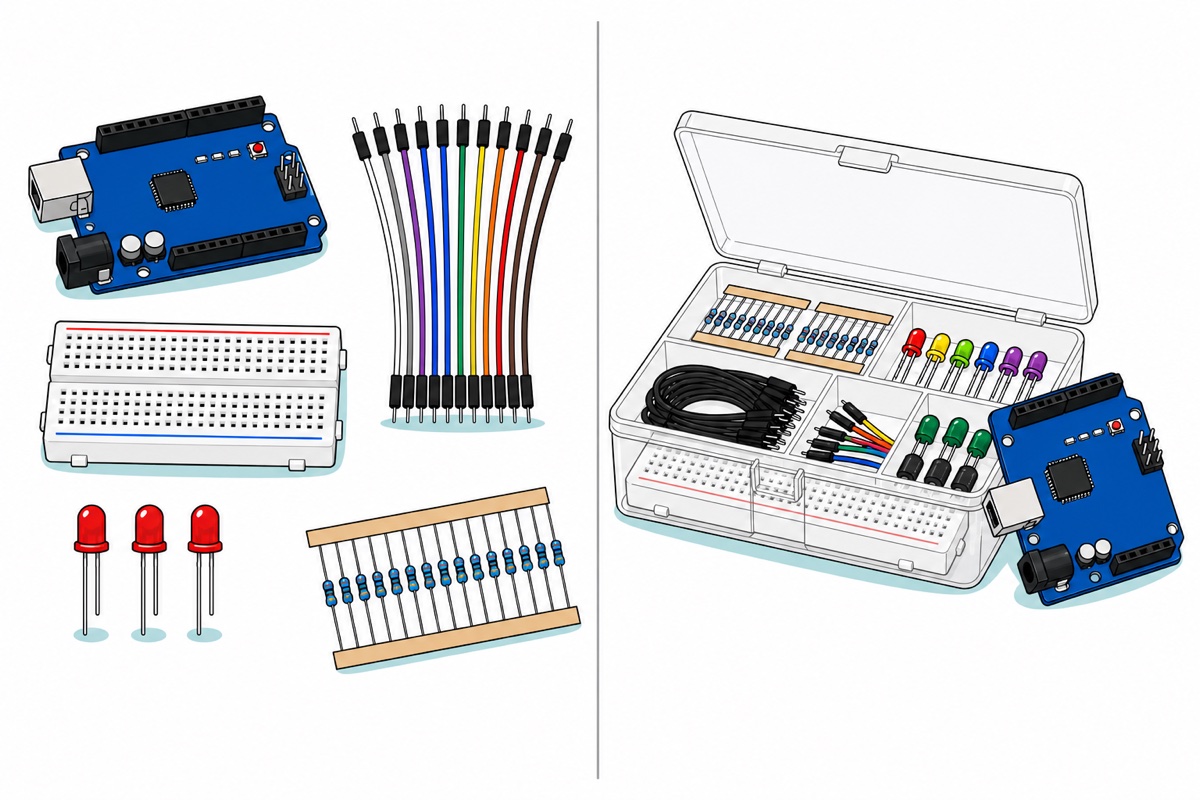
The first route is buying the components separately, and it is the route the parts list above follows. The UNOCH34 board connects to your computer with a USB Type B cable, the squarish desktop-printer kind already sitting in a drawer in most homes. Add a 400-hole breadboard, a pack of male-to-male dupont wires, a few 5 mm red LEDs and a resistor pack, and you are set for your first week.
If connector genders are confusing, the jumper wire types guide explains them once for all your projects.
The second route is a ready-made box. ELECTU3 brings the components and a UNO R3 board together, while ELECTRK is the same box without the board — useful if you already have an Uno but want resistors, LEDs, wires and an 830-hole breadboard in one compartmented case.
What is a realistic first-week Arduino project?
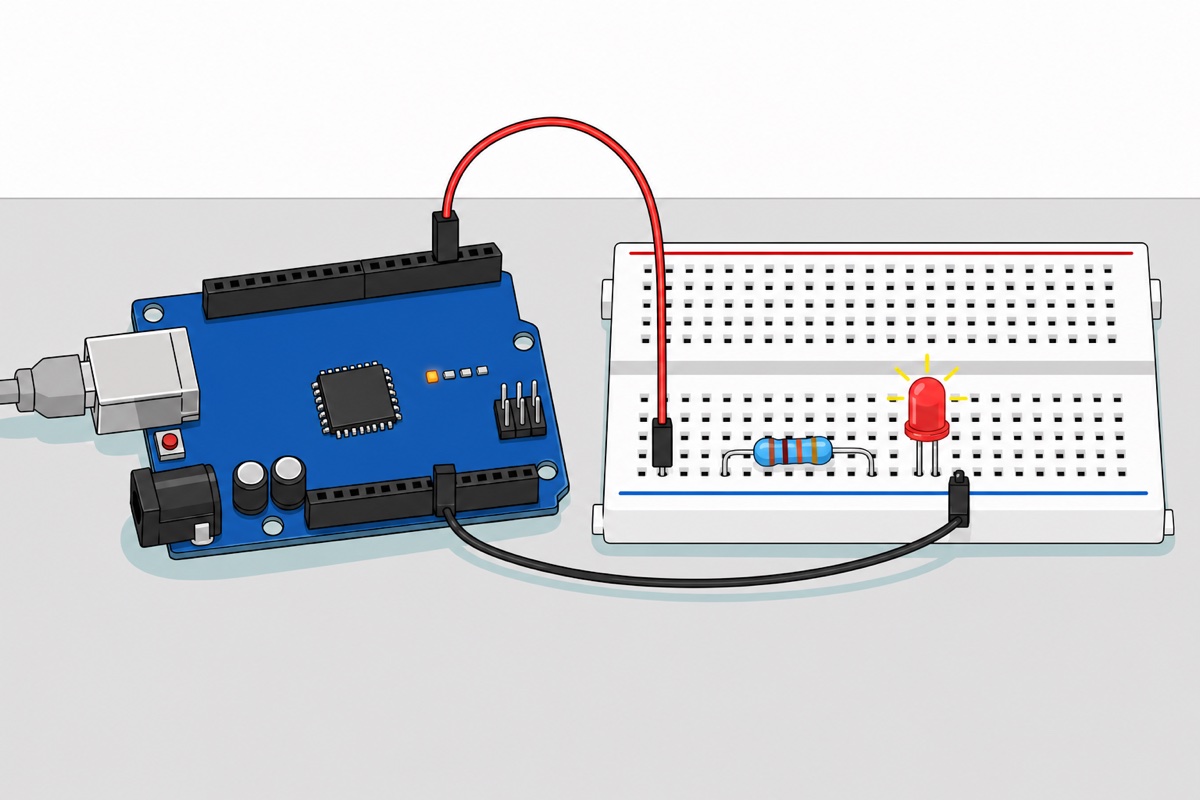
The first project for an Arduino Uno is not a robot — it is one LED, because every bigger project is built from the same three skills: choosing a pin, limiting the current, and reading your own loop.
| Day | What you build | What you need |
|---|---|---|
| 1 | Upload Blink, the “L” LED on the board blinks | Just the board and one USB Type B cable |
| 2–3 | Your first red LED on the breadboard | Breadboard, 1 LED, 1 resistor, 2 wires |
| 4–5 | Three LEDs blinking in sequence | 3 LEDs, 3 resistors, 4 wires |
| 6–7 | Fade up and down slowly with analogWrite on a PWM pin |
Same circuit, moved to pin 9 |
Day one needs the board, one USB Type B cable, and one free piece of software: the Arduino IDE, where sketches are written and sent to the board. Blink is already inside it — open File → Examples → 01.Basics → Blink, so nothing has to be typed on day one. The board recommended here uses the CH340G USB chip, so your computer needs one small driver installed once before the COM port appears; that step is explained in full in the Arduino Nano V3 with CH340 driver guide, and it is identical for this Uno because the USB chip is the same. If you would rather install no driver at all, the UNO16U2 variant uses the ATmega16U2 USB chip that modern Windows recognises on its own.
For an external LED on day two, a series resistor is not optional. An LED does not limit its own current: past roughly 2 V the voltage across it barely rises further even as the current shoots up — nothing inside it holds the current back. Wire it straight to 5 V and the current climbs until something burns, usually the LED first; the series resistor is what sets it. A 220 Ω resistor gives 13.6 mA as calculated above; 1 kΩ gives (5 − 2) ÷ 1000 = 3 mA, dimmer but still clearly visible. Any value between the two is safe.
| Connection | From | To | Why |
|---|---|---|---|
| 1 | Pin 13 (DIGITAL row) | One end of the resistor | This is the pin your code switches on and off; the board’s “L” LED blinks along with it because the Uno R3 drives that one through a separate buffer, not from this pin’s current |
| 2 | The resistor’s other end | The LED’s long leg (anode) | The resistor limits the current before it reaches the LED; it can sit on either leg because the current in a series circuit is the same at every point |
| 3 | The LED’s short leg (cathode) | GND pin | Completes the circuit back to the board |
Two breadboard notes decide whether this circuit lights at all. First, the LED’s long and short legs must go into two different five-hole rows; in the same row the legs are joined directly and the LED is bypassed. Second, when you step up to three LEDs on day four, do not run three GND wires: run one wire from the board’s GND pin to the blue rail along the edge of the breadboard, then every short leg to that rail. That is why three LEDs need only four wires — three signals and one shared GND.
If you want to see the whole thing in motion at once, this short Afrotechmods course walks through choosing a board, an LED on a breadboard, dimming with PWM and finally motor speed control — the physical movement text struggles to convey.
The second week is where sensors come in. The two neatest builds after an LED are the Arduino traffic light project, which uses the same loop with three outputs, and the automatic light with an LDR light sensor, which introduces your first analog input. For school coursework, a list of ideas is in the RBT electronics project ideas guide.
Common mistakes we see
Fitting the LED backwards. An LED passes current one way only. The longer leg is the anode and must face the pin being controlled; the short leg goes to GND. Backwards, nothing happens and nothing is damaged — so if your circuit is silent, turn the LED around before blaming the code.
Misreading the breadboard lanes. Each short five-hole row is joined internally, but not across the channel down the middle, and the two long strips along the edges are separate power rails. Two legs of one component in the same five-hole row is a short circuit, not a connection — the most common cause of “I followed the picture but it does not work”.
Buying the board only. The Uno arrives, the USB cable goes in, the “L” LED blinks — and it stops there, because there is no breadboard and no wire to get off the board. A breadboard, a pack of wires and a few LEDs are the difference between one evening and a full week.
FAQ
What is an Arduino, really?
An Arduino is a small circuit board with a single microcontroller chip that runs one program — yours — over and over for as long as it has power. It has no operating system, no screen and no files; its job is to read the signals on its input pins, make a decision, and switch the voltage on its output pins on or off to control lamps, buzzers, relays or motors.
Do you need to know coding before using an Arduino?
No. Every Arduino program has the same shape: setup(), which runs once to set each pin’s role, and loop(), which repeats forever. The first Blink program is only ten lines and uses just three instructions, so the fastest way to learn is to upload a sketch that already works, change one number, and see what changes.
What can an Arduino do?
The Arduino Uno is made for controlling things: switching lamps, buzzers and relays by time or condition, reading temperature, light, distance and buttons, and adjusting motor speed through a driver module. It is not made for processing images or video, storing files, or connecting to Wi-Fi without an extra module, because it has only 2 KB of working memory and no radio inside it.
How much does it cost to start learning Arduino?
Starting out takes five items: an Uno board with a printer-style USB Type B cable, a breadboard, a pack of male-to-male dupont wires, a few LEDs and a resistor pack. The parts list in this guide shows each item’s current price live, so the total is the sum of those rows; a ready-made kit box is the second route, bundling the same items together.
Arduino Uno or ESP32 for a beginner?
The Arduino Uno for learning the basics, because its pins are 5 V, its headers are large and easy to reach, and almost every beginner tutorial is written for it. Choose the ESP32 if your first project genuinely needs to send data to a phone or the internet, because the Wi-Fi radio is inside its chip package. The full comparison is in the ESP32 vs ESP8266 vs Arduino Uno guide.
Last updated August 2026. Stuck? Chat with us on WhatsApp.

Pingback: Arduino Starter Kit: What's Actually Inside, and Is It Worth It?