

Tutorials
Water Tank Level Sensor with Arduino and the JSN-SR04T
Jun
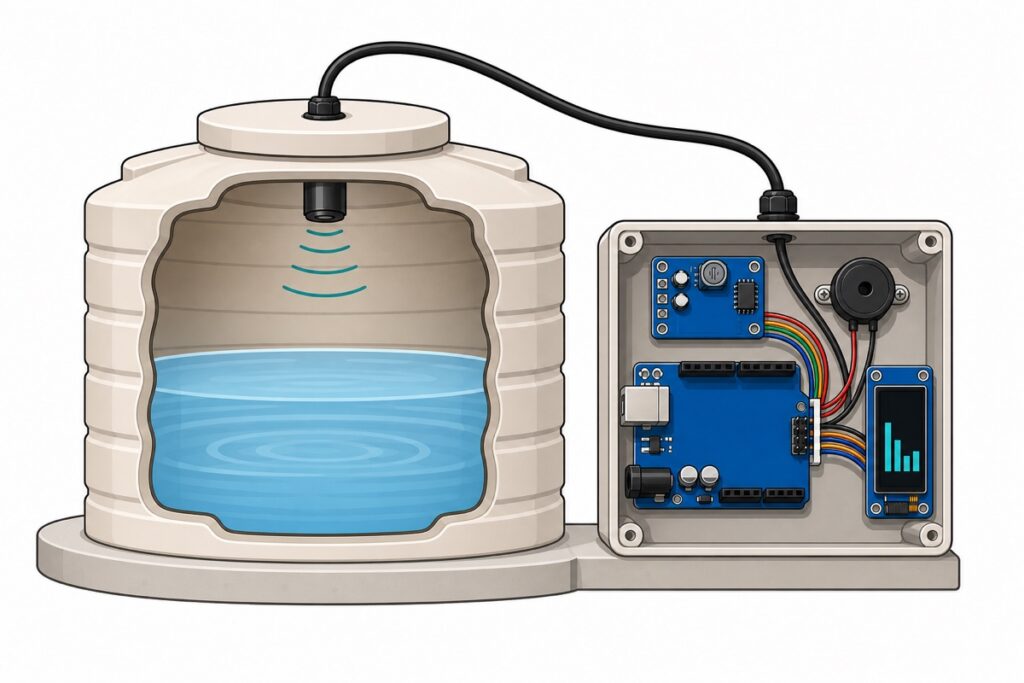
Want to know when the water tank (tangki) on your roof is about to run dry? Mount a JSN-SR04T probe on the tank lid facing down — it measures the distance to the water surface, an Arduino Uno turns that distance into a percentage, shows it on a small OLED and sounds a buzzer when the level drops below 20%. Only the black probe is waterproof — the blue driver board must sit dry outside the tank.
Why use the JSN-SR04T instead of a regular HC-SR04?
The JSN-SR04T sensor comes in two parts: a fully sealed black cylindrical probe (rated IP67) on a long cable with a white 2-pin plug, and a separate blue driver board with a 4-pin header. A regular HC-SR04 has two exposed “eyes” that fail quickly in the humid air of a tank — for anything involving water, this fully enclosed probe is the one to use.
According to the Manorshi manufacturer datasheet, the module measures 21 cm to 600 cm on a 3.0–5.5V DC supply, with trigger and echo working exactly like the HC-SR04 — we cover the basics of ultrasonic ranging in our HC-SR04 guide.
Parts list
 Arduino Uno Compatible SMD UNO R3 with Type B Cable - ATMEGA328P with CH340G-Microcontroller Project
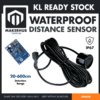 Waterproof Ultrasonic Distance Sensor JSN-SR04T Module Water Level Measurement Range Finder 20-600cm Arduino
 0.91' OLED Display Module I2C Communication 3.3V 5V For Arduino IOT Application
 SFM-20B Active Buzzer DC 3-24V Piezoelectric Long Continous Beep
For a permanent install
| Item | Price | Qty | |
|---|---|---|---|
 Power Supply Adapter DC Universal AC to DC Converter PSU 5V2A 5V3A 9V2A 12V2A - P.S. ADAPTOR (12V2A)PSA1202 Power Supply Adapter DC Universal AC to DC Converter PSU 5V2A 5V3A 9V2A 12V2A - P.S. ADAPTOR (12V2A)PSA1202 | RM15.95 | Out of stock |
A 12V adapter straight into the Uno's DC jack — the monitor runs 24 hours a day without a laptop.
Where should the probe sit on the tank?
The JSN-SR04T probe has one important limitation: a dead zone. It cannot measure anything too close to it — the Manorshi version 3.0 datasheet states a 21 cm minimum, while older datasheet revisions state 25 cm. Because this figure varies by board revision, design your system around the safer number: treat 25 cm as the dead zone.
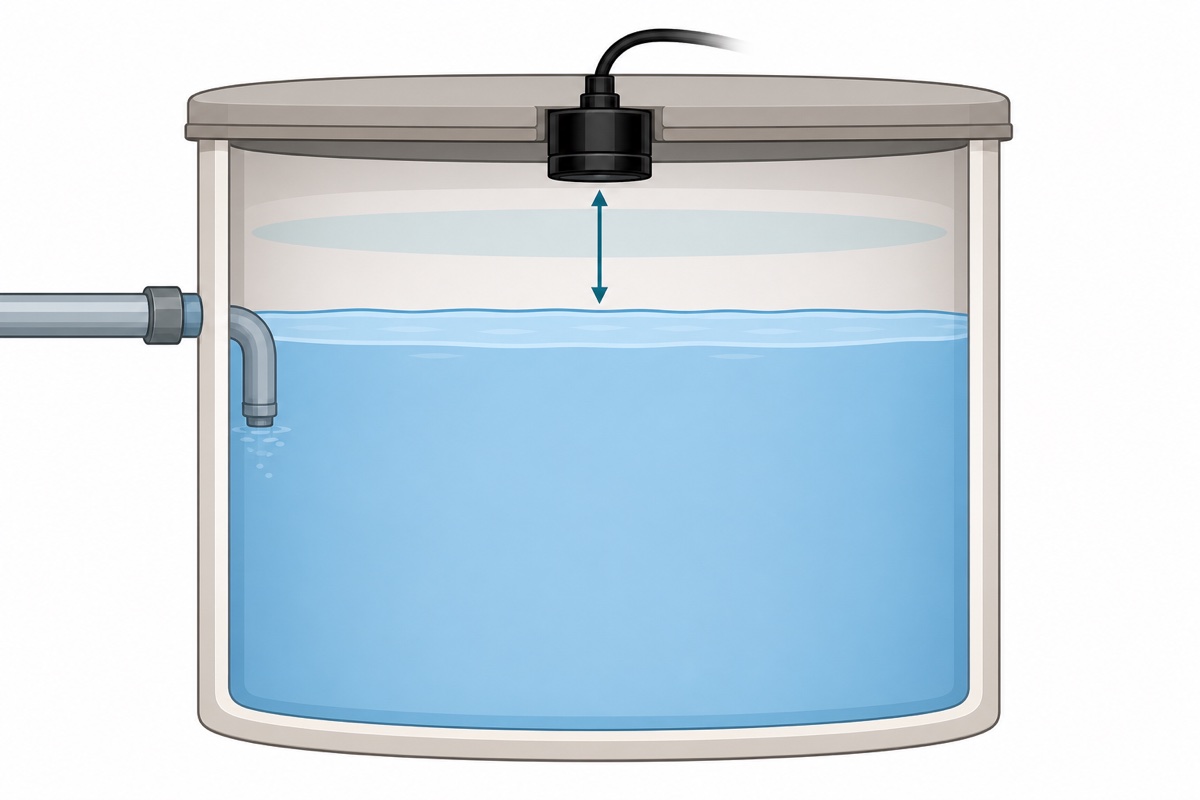
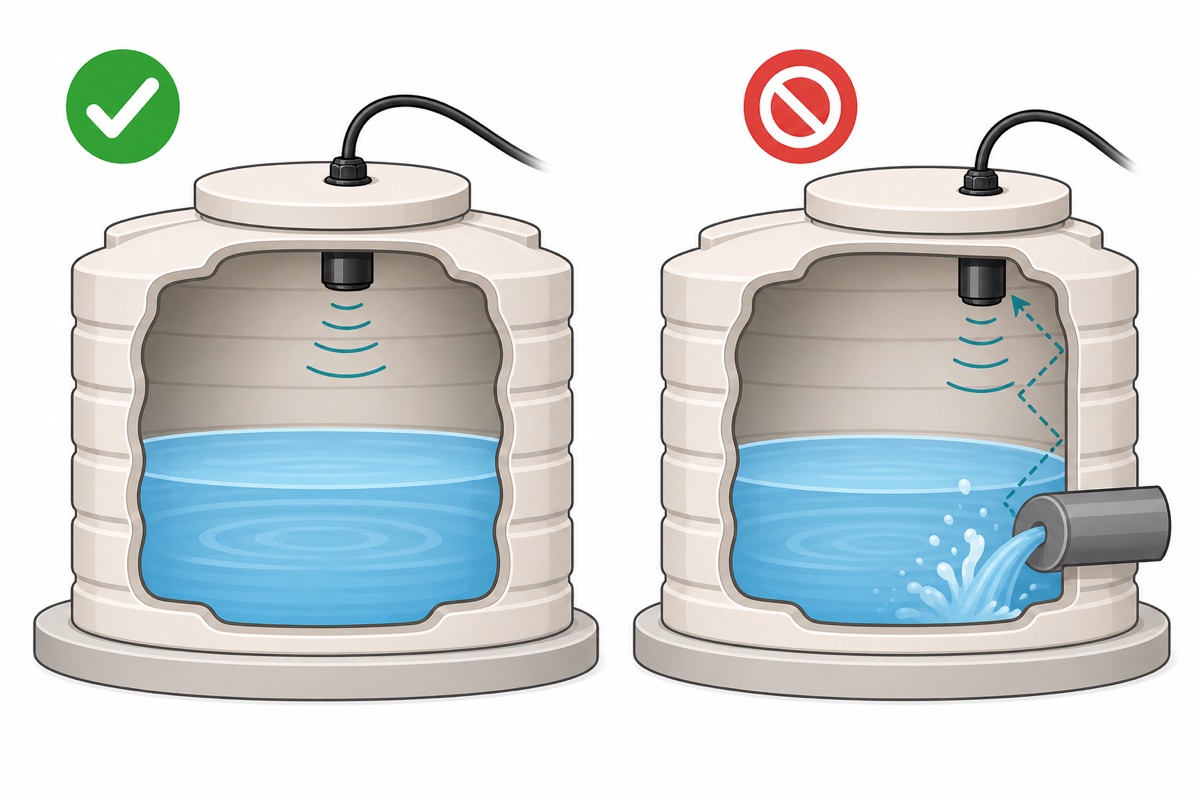
In practice, mount the probe at least 30 cm above the full water line — when the tank is full, the surface stays outside the dead zone, and this offset goes into the code’s arithmetic later. The probe radiates in a wide 75-degree cone, so place it in the middle of the lid, away from the walls and the inlet point, so wall echoes and inlet splash don’t disturb the readings.
Don’t leave the probe hanging on its cable — it swings and ends up tilted. Drill a hole in the centre of the lid sized to the probe head, seat the probe so its face points straight down, and seal around it with silicone sealant or a cable gland. The driver board, Uno and buzzer live in a dry, shaded box outside the tank; only the probe head passes through the lid. Rooftop work has its own rules: never climb up alone, tie the cable neatly to existing pipes or structure, and keep mains wiring well away from the tank. For a permanent install, power the Uno with a 12V adapter into its DC jack — the mains socket stays inside the house, and only the low-voltage DC cable runs up to the electronics box.
How do you wire the JSN-SR04T, OLED and buzzer to the Uno?
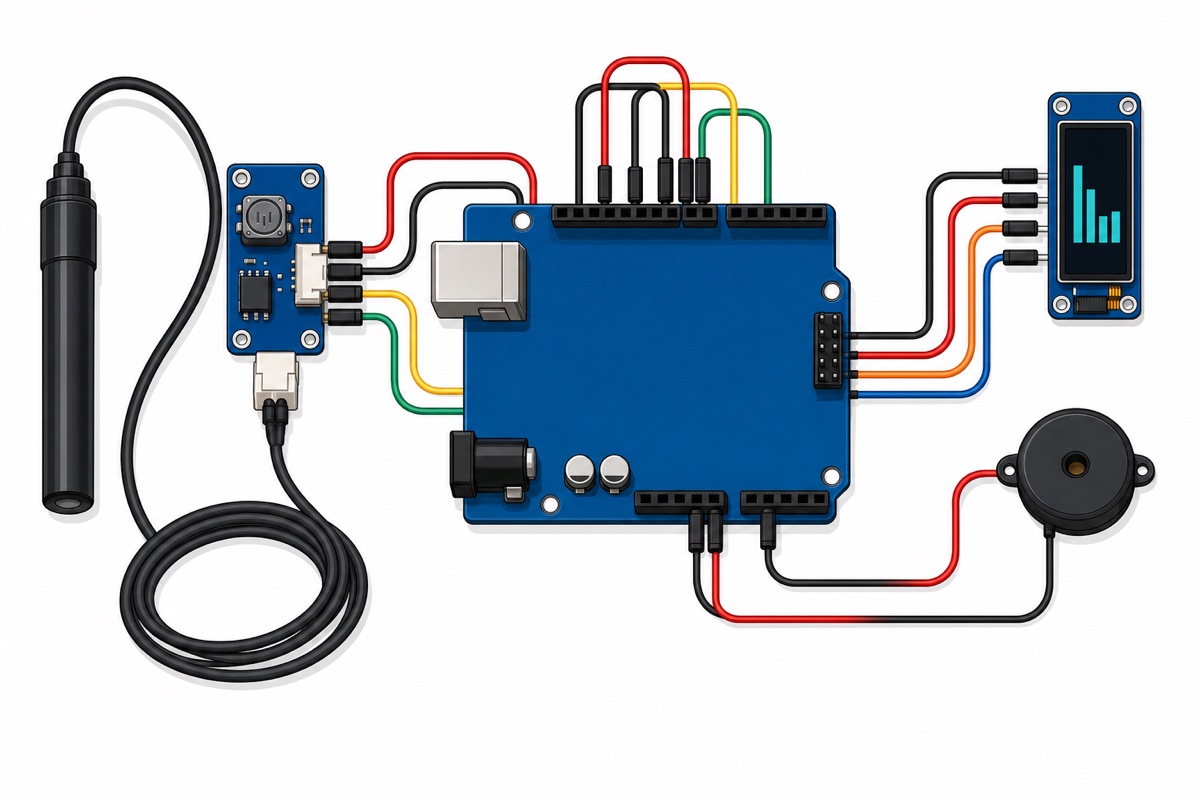
The JSN-SR04T driver board uses four pins — Vcc, GND, Trig, Echo — and the white 2-pin plug on the probe cable pushes straight into the socket on that board. The 0.91-inch 128×32 OLED connects over I2C: on the Arduino Uno, the I2C pins are A4 (SDA) and A5 (SCL). Note this OLED’s header order: GND, VCC, SCK, SDA — the pin labelled SCK here is the I2C clock line, the same signal as SCL, just printed under a different name.
| Component / pin | Connect to |
|---|---|
| JSN-SR04T Vcc | Uno 5V |
| JSN-SR04T GND | Uno GND |
| JSN-SR04T Trig | Uno D9 |
| JSN-SR04T Echo | Uno D8 |
| Probe cable (white 2-pin plug) | Socket on the driver board |
| OLED GND | Uno GND |
| OLED VCC | Uno 5V |
| OLED SCK (SCL line) | Uno A5 |
| OLED SDA | Uno A4 |
| Buzzer red wire (+) | Uno D7 |
| Buzzer black wire (−) | Uno GND |
The SFM-20B buzzer is an active piezo type — its spec sheet lists 10 mA maximum at its rated 12V, and at 5V it draws even less — far below the Uno’s 20 mA per-pin limit, so it can be driven straight from a digital pin with no transistor (unlike current-hungry electromagnetic buzzers). It is also loud, around 95 dB — which is why the code sounds short periodic beeps rather than a continuous tone.
If you want to see this sensor physically assembled with an OLED before you start, this short video walks through it step by step:
How does distance become a water percentage?
The Arduino Uno only ever knows one thing: the distance from the probe face to the water surface. To turn distance into level, you need two fixed measurements from your own tank — the full distance (probe to the full water line, say 30 cm) and the empty distance (probe to the tank floor, say 150 cm). Water depth = empty distance − reading; percentage = depth ÷ (empty distance − full distance) × 100.
Example: the sensor reads 90 cm on that same tank. Water depth = 150 − 90 = 60 cm, and percentage = 60 ÷ (150 − 30) × 100 = 50%. Measure these two fixed numbers with a tape measure during installation — the accuracy of the whole system depends on them.
Why do readings jump around inside a tank, and how do you steady them?
JSN-SR04T readings inside a real tank rarely sit still. The surface churns every time the inlet pipe pours in, small ripples scatter the echo, that 75-degree cone can catch the tank wall, and water vapour can condense on the probe face — any one of these can trigger a wild reading.
The most effective fix: take several readings and use the median, not the average. One wild 400 cm reading among seven samples drags an average far off course, but the median simply takes the middle value after sorting — the wild reading is thrown away. For spiky ultrasonic data like this, the median almost always wins.
Temperature also affects the speed of sound: roughly 331.5 m/s at 0°C, rising about 0.6 m/s per 1°C. Our code assumes 343 m/s (around 20°C); the air space in a sun-baked tank can reach 40°C, skewing readings by nearly 4% — roughly 3 to 4 cm per metre of distance. For a percentage display and an alarm this is negligible; if you want centimetre accuracy, calibrate the empty distance on site at midday.
What is the full code for this monitor?
The sketch needs two libraries from the Arduino IDE Library Manager: Adafruit GFX Library and Adafruit SSD1306 (the Wire library is built in). This 0.91-inch module’s I2C address is 0x3C. Adjust JARAK_PENUH (probe-to-full distance) and JARAK_KOSONG (probe-to-floor distance) to match your tank, and the sketch is ready to run.
#include <Wire.h>
#include <Adafruit_GFX.h>
#include <Adafruit_SSD1306.h>

Adafruit_SSD1306 oled(128, 32, &Wire, -1);

const int PIN_TRIG   = 9;
const int PIN_ECHO   = 8;
const int PIN_BUZZER = 7;

// Your tank measurements — adjust these two values
const float JARAK_PENUH  = 30.0;   // cm: probe to the FULL water line (stays outside the 25 cm dead zone)
const float JARAK_KOSONG = 150.0;  // cm: probe to the tank floor

const int AMBANG_ALARM = 20;   // buzzer starts sounding below 20%
const int AMBANG_RESET = 30;   // buzzer goes quiet again after rising above 30% (hysteresis)
const int BIL_SAMPEL   = 7;    // number of readings for the median

bool alarmAktif = false;

float bacaJarakSekali() {
  digitalWrite(PIN_TRIG, LOW);
  delayMicroseconds(2);
  digitalWrite(PIN_TRIG, HIGH);
  delayMicroseconds(10);                    // 10us trigger per the datasheet
  digitalWrite(PIN_TRIG, LOW);
  unsigned long tempoh = pulseIn(PIN_ECHO, HIGH, 40000UL);
  if (tempoh == 0) return -1.0;             // no echo received
  return tempoh * 0.0343 / 2.0;             // 343 m/s (~20 deg C)
}

float bacaJarakMedian() {
  float sampel[BIL_SAMPEL];
  int n = 0;
  for (int i = 0; i < BIL_SAMPEL; i++) {
    float j = bacaJarakSekali();
    if (j > 0) {
      int k = n;                            // ascending insertion sort
      while (k > 0 && sampel[k - 1] > j) {
        sampel[k] = sampel[k - 1];
        k--;
      }
      sampel[k] = j;
      n++;
    }
    delay(60);                              // let old echoes die out first
  }
  if (n == 0) return -1.0;
  return sampel[n / 2];                     // middle value = median
}

void setup() {
  pinMode(PIN_TRIG, OUTPUT);
  pinMode(PIN_ECHO, INPUT);
  pinMode(PIN_BUZZER, OUTPUT);
  oled.begin(SSD1306_SWITCHCAPVCC, 0x3C);   // I2C address of the 0.91-inch module
  oled.clearDisplay();
  oled.display();
}

void loop() {
  float jarak = bacaJarakMedian();
  oled.clearDisplay();
  oled.setTextColor(SSD1306_WHITE);

  if (jarak < 0) {
    oled.setTextSize(1);
    oled.setCursor(0, 12);
    oled.print(F("Tiada bacaan sensor"));   // check the probe plug and wiring
    oled.display();
    return;
  }

  // Convert distance to water depth and percentage
  float julat = JARAK_KOSONG - JARAK_PENUH;
  float dalamAir = JARAK_KOSONG - jarak;
  dalamAir = constrain(dalamAir, 0.0, julat);
  int peratus = round(dalamAir / julat * 100.0);

  oled.setTextSize(2);                      // big percentage on the left
  oled.setCursor(0, 9);
  oled.print(peratus);
  oled.print(F("%"));
  oled.setTextSize(1);                      // small depth readout on the right
  oled.setCursor(72, 6);
  oled.print(F("Dalam:"));
  oled.setCursor(72, 18);
  oled.print(dalamAir, 0);
  oled.print(F(" cm"));
  oled.display();

  // Hysteresis: ON below 20%, OFF again only after rising above 30%
  if (!alarmAktif && peratus < AMBANG_ALARM) alarmAktif = true;
  if (alarmAktif && peratus > AMBANG_RESET) alarmAktif = false;

  if (alarmAktif) {                         // short beep, not a continuous tone
    digitalWrite(PIN_BUZZER, HIGH);
    delay(150);
    digitalWrite(PIN_BUZZER, LOW);
  }

  delay(1000);
}
Note the two alarm thresholds: the buzzer starts sounding when the level drops below 20%, but only goes quiet again once the level rises past 30%. Without this hysteresis, water sloshing around the 20% mark would flick the buzzer on and off endlessly. A popular next step: add a relay and a pump so the tank refills itself — the concept is the same as our automatic plant watering system.
Common mistakes we see
Readings stuck at 0 or one fixed number. Usually the probe’s white plug isn’t seated firmly in the driver board, or the Trig and Echo wires are swapped. Reseat the probe plug and check Trig to D9, Echo to D8 against the table above.
Readings jumping wildly. The probe is usually too close to the tank wall or directly above the inlet stream — move it to the middle of the lid. If a full tank puts the surface inside the 25 cm dead zone, readings also turn to nonsense: raise the probe mounting.
Fine on the bench, garbage in the tank. On a bench the probe faces a flat, motionless floor — ideal conditions. In the tank, make sure the probe points straight down; a tilt of just a few degrees sends the echo to the wall instead of back to the probe — which is exactly why the probe is seated snugly in a hole in the lid, not left dangling free.
The system dies after a few weeks outdoors. Almost always the driver board or the Uno got exposed to rain and dew. Once more: only the probe is waterproof — every board must live in a sealed enclosure, with the cable holes sealed too.
Frequently asked questions about tank water level sensors
How tall a tank can this handle?
The JSN-SR04T measures up to 600 cm, so after subtracting the 30 cm mounting offset, even a 5-metre-deep tank is still within range. Typical home poly tanks in Malaysia are 1 to 2 metres — well within this sensor’s comfort zone.
Will choppy water throw off the readings?
Normal sloshing is already absorbed by the median of 7 readings in the code. If your tank is constantly churning hard, raise BIL_SAMPEL to 11, or hang a vertical length of PVC pipe under the probe as a stilling well — the water inside the pipe is far calmer than the open surface.
Can the probe survive rooftop sun?
The probe is rated IP67 and the datasheet states an operating range of -20°C to +70°C, so Malaysian rooftop heat stays within limits. What needs protecting is the electronics: put the driver board and the Uno in a sealed box in the shade, not out in the blazing sun.
Can it send alerts to my phone?
The Arduino Uno has no WiFi, so an OLED and buzzer is as far as it goes. Step up to an ESP32 and nearly identical code can push notifications to your phone — see our ESP32, ESP8266 and Uno comparison to pick the right board.
Does it work for an underground tank?
Yes — the principle is the same: probe on the top cover, facing down. Underground tank air is just more humid, so condensation droplets form on the probe face more often; wipe the probe face at every service, and keep the driver board above ground level in a dry enclosure.
Last updated August 2026. Stuck? Chat with us on WhatsApp.

Pingback: Ultrasonic Mist Maker Module: DIY Humidifier Build