

Tutorials
Smart Dustbin with Arduino (HC-SR04 + SG90 Servo): Full Code
Aug
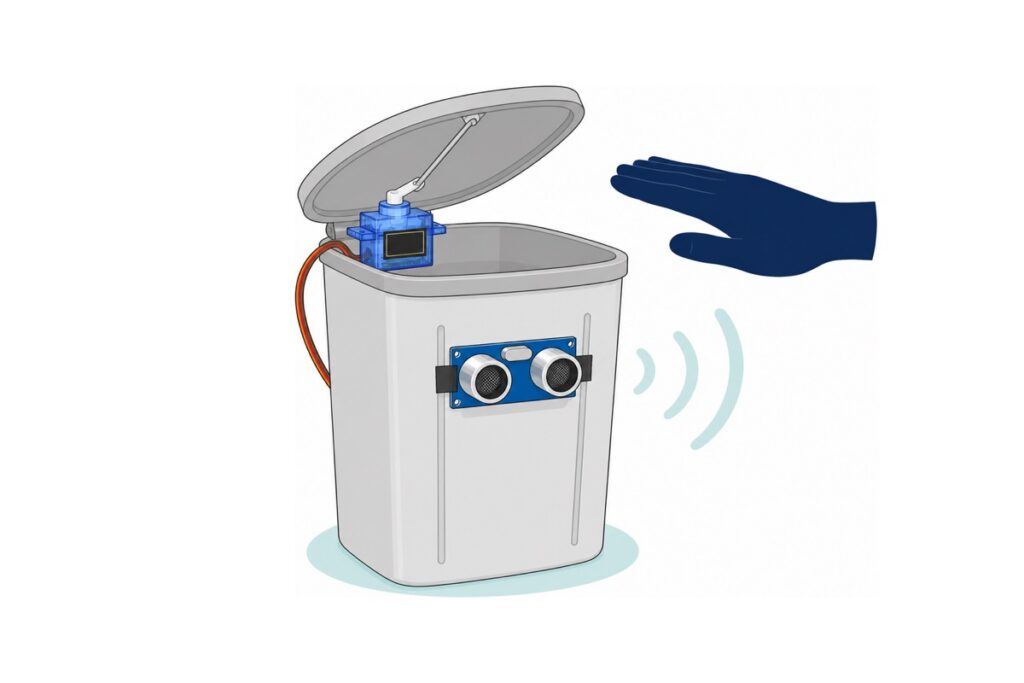
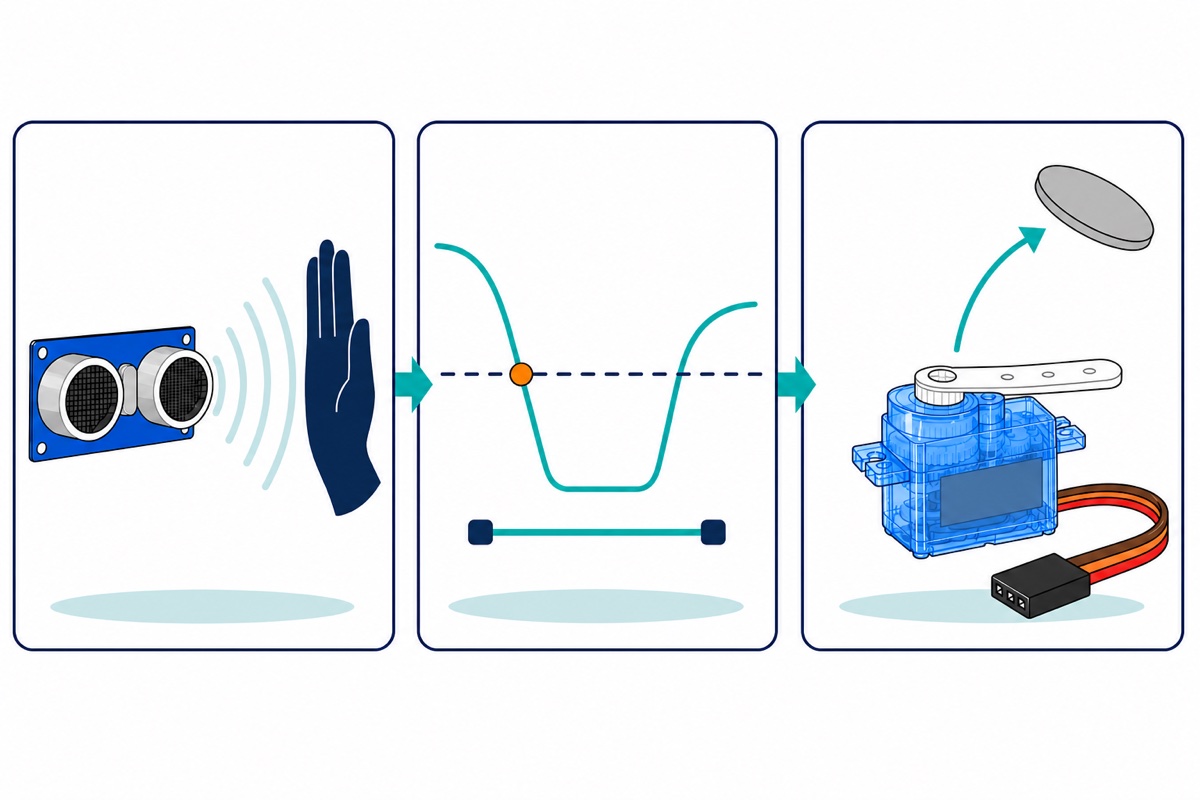
An automatic dustbin for a Form 3 RBT project is three simple blocks: the HC-SR04 measures hand distance, the Arduino Uno compares it to one threshold, and an SG90 servo lifts the lid. What fails most often is not the code — it is power. A servo drawing 5V from the Uno makes the lid judder and the board reset mid-demo.
What do you need to build this automatic dustbin?
This project needs no soldering — every connection is made with jumper wires and one breadboard.
Parts list — automatic dustbin RBT project
 Ultrasonic Sensor HC-SR04 Ultrasonic Range Detection Distance Finder Obstacle avoidance For Arduino Application
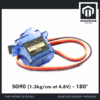 SG90 MG90 Tower Pro Micro Servo Motor 9g 180 360 Servo Motor for Arduino Robotic - SG90- 180°
 Arduino Compatible UNO R3 FT232 Development Board Arduino Compatible CH340 Alternative
 Data Cable Type-A Type-C MicroUSB Type-B 0.5m 1m 30cm 0.3m 100cm Data Transfer Upload Code - TYPE-A TO TYPE-B (1.0M)
 MB102 Breadboard 170 400 830 Holes Breadboard Donut Board Arduino Prototype Multi Color - BREADBOARD (400 HOLES)
 40pcs Dupont Wire 10cm 20cm 30cm for Breadboard DIY Experiment Jumper Wire Breadboard wire - DUPONT WIRE M-M 20CM
 40pcs Dupont Wire 10cm 20cm 30cm for Breadboard DIY Experiment Jumper Wire Breadboard wire - DUPONT WIRE M-F 20CM
 AA Battery Holder with Cover On/Off Switch 2/3/4 Slots Battery AA Holder Red/Black Wire - AA BATTERY CASE (4S)
Parts list
| Item | Price | Qty | |
|---|---|---|---|
 Electrical Insulation Tape 18mm x 10m PVC Color Coded Marking Red White Blue Yellow Green Black - ELECTRICAL TAPE (BLACK)T1609BK Electrical Insulation Tape 18mm x 10m PVC Color Coded Marking Red White Blue Yellow Green Black - ELECTRICAL TAPE (BLACK)T1609BK | RM1.90 |
For sticking the sensor and servo onto the bin body, and insulating the battery wire joints. Any electrical tape will do.
Male-to-female matching is what keeps this build solder-free. The HC-SR04 has four male pins, so it needs the female ends of M-F jumpers — which double as the flying lead letting the sensor sit on the bin’s front face. The SG90 servo lead ends in a black 3-hole female connector, so M-M jumper pins go into it. The battery holder leads are stranded and bare-tipped: twist tight and fold the tip back before pushing it into a breadboard rail, or the fine strands splay and pull out. The Uno is programmed over full-size USB-B, so take an A-to-B cable with it; in the Arduino IDE choose the Arduino Uno board and the port that appears when you plug in.
How do the HC-SR04, Arduino and servo form input–process–output?
The HC-SR04 is the input block. A 10-microsecond pulse on Trig makes it fire a 40kHz burst, then it raises Echo and holds it high for the sound’s travel time out and back. The code only measures that width. Sound travels about 343 metres per second, or 0.0343cm per microsecond, and since the time covers the round trip, distance = time × 0.0343 ÷ 2. A warmer room raises the speed of sound about 2%, or 0.3cm at a 15cm threshold — irrelevant here. The rest of the pulse mechanics sit in our HC-SR04 ultrasonic sensor guide.
Our current HC-SR04 boards print combined silkscreen labels: Vcc, Trig_RX_SCL, Echo_TX_SDA, Gnd. The extra words belong to other communication modes this project never uses — treat the second pin as Trig and the third as Echo, like any other HC-SR04.
The SG90 servo is the output block. It takes a pulse every 20 milliseconds; the pulse width sets the shaft angle — not voltage, not current. Because position is asked as an absolute angle, the 180° servo is right for a bin lid — the 360° version is a continuous-rotation servo that knows only direction and speed, and cannot hold a lid at an angle. The difference sits in our 180° vs 270° vs 360° servo guide.
Between them sits the process block — threshold, reading confirmation and hold-open timer — the content of the “process” section in your RBT folio.
Why does the lid judder and the Uno reset when the servo runs off the 5V pin?
The SG90 servo contains an ordinary brushed DC motor and gearbox. The instant it starts moving — worse still when the lid jams — the rotor is not yet turning, so no back-EMF opposes the supply and coil resistance alone sets the current. That is the surge: hundreds of milliamps in a blink, far above its running current.
Look where that surge must come from. A computer’s USB port is rated 500mA, and USB power reaches the Uno R3 through a 500mA polyfuse — not a switch but a resistor that heats and raises its resistance as current rises, so its first effect is a voltage drop, not a disconnection. A bare board already draws about 50mA and the HC-SR04 another 15mA, leaving under half an amp — and with cable resistance, every servo surge drags the rail down before reaching the board.
That voltage drop is what makes it judder — not because the servo misreads its position. The controller chip in an analogue servo like the SG90 feeds its own feedback potentiometer from a built-in regulator whose reference stays steady as the supply moves; shaft position is read as a resistance turned into a pulse time, not a raw voltage. The servo is not confused — it is starved. A sagging rail means weak torque, so the shaft never reaches the angle asked for, the error stays open, and the control circuit keeps driving the motor, which keeps pulling current. Every 20-millisecond pulse is judged again on a rail now sagging and full of brush noise, so the drive direction keeps flipping — that is the buzz and judder you hear. HC-SR04 readings on the same rail wobble too, and if the polyfuse finally opens, the Uno loses power and restarts.
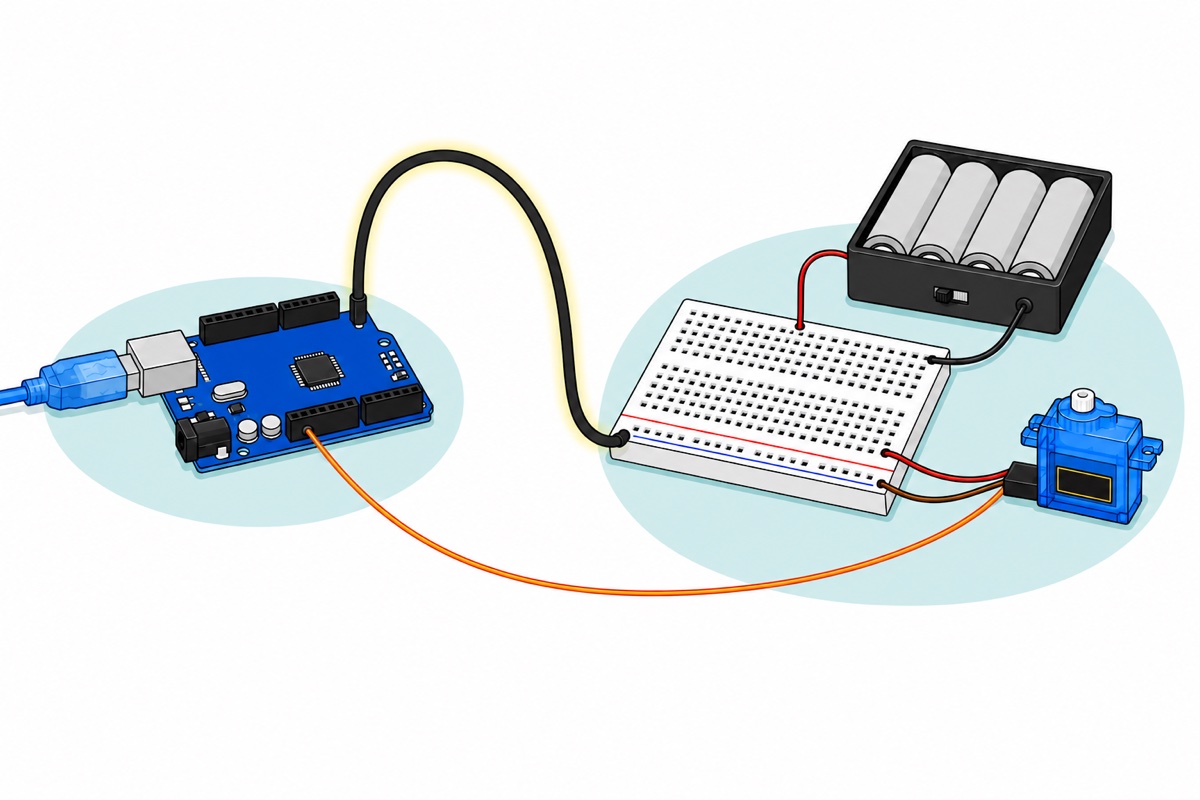
The fix is separating the supplies, not lowering the angle or slowing the code. Give the servo its own: four AA cells in a battery holder (four in series, roughly 6V, with a built-in ON/OFF switch) feeding the breadboard power rails; the servo’s red and brown wires draw from them. Servo current never passes through the Uno.
One wire must not be left out: the battery GND must connect to the Uno GND. The servo’s orange wire carries a voltage, and voltage only means something against a reference. If the servo’s 0V and the Uno’s 0V never meet, the “5V pulse” the Arduino sends has no shared reference at the servo end, so the servo ignores it or twitches. Joining the grounds gives both sides the same zero.
Do not feed that same 6V pack into the Uno’s VIN pin. This board’s recommended input is 7–12V, because the on-board regulator needs headroom; at 6V it sits at the bottom of the range and the 5V rail sags as the batteries weaken. Nor push it into the 5V pin as a shortcut: that pin bypasses the regulator and goes straight to the ATmega328P’s VCC leg, whose absolute maximum is 6.0V — below what a fresh alkaline pack delivers. Power the Uno over USB — a laptop while uploading, or a power bank through the A-to-B cable for a standalone demo. Four fresh alkaline cells read about 6.2–6.4V unloaded, a little above the servo’s 4.8–6V range; that falls back into range the moment the motor draws current — which is why the 4×AA practice works on every RBT bench. To stay inside the rated range at all times, four rechargeable NiMH cells (4 × 1.2V = 4.8V) are the by-the-book choice.
How do you wire the circuit?
Unplug the USB and switch the AA pack off before wiring anything. The last row — the common ground — is the most-often-missed one.
| From | To | Why |
|---|---|---|
| HC-SR04 Vcc (end pin) | Uno 5V | About 15mA only — safe on the USB rail |
| HC-SR04 Trig (second pin) | Uno D7 | The Uno sends a 10 µs trigger pulse |
| HC-SR04 Echo (third pin) | Uno D6 | Pulse width = travel time of the sound |
| HC-SR04 Gnd (other end pin) | Uno GND | Zero reference for the Echo signal |
| Servo orange wire | Uno D9 | 50 Hz position pulses; current here is near zero |
| Servo red wire | Breadboard + rail | Motor current comes from the batteries, not the Uno |
| Servo brown wire | Breadboard − rail | Return path for the motor |
| Battery holder red wire | Breadboard + rail | Roughly 6V from four cells in series |
| Battery holder black wire | Breadboard − rail | Completes the battery circuit |
| Uno GND (second GND pin) | Breadboard − rail | Common ground — without it the servo twitches or stays dead |
How does the automatic dustbin code work?
Three design decisions make this lid stable. A threshold turns a raw number into a yes/no decision. Two confirmed readings in a row throw out the stray one: an echo off the bin rim sometimes returns early and gives a false small number. A hold-open timer separates “lid open time” from “hand still there”, so the lid never drops onto a hovering hand, nor flaps while a hand sits on the threshold line.
There is no delay() in loop(), so the sensor keeps reading while the lid is open — which lets each fresh detection refresh the timer. This sketch uses 4,738 bytes, 14% of the Uno’s program memory.
// Automatic dustbin - HC-SR04 + SG90 servo on an Arduino Uno.
// No delay() in loop(), so the sensor keeps reading while the lid is open.

#include <Servo.h>

const uint8_t TRIG_PIN  = 7;   // HC-SR04 Trig
const uint8_t ECHO_PIN  = 6;   // HC-SR04 Echo
const uint8_t SERVO_PIN = 9;   // servo orange wire (signal)

const int SUDUT_TUTUP = 10;    // tune to suit your own lever arm
const int SUDUT_BUKA  = 90;

const long          AMBANG_CM    = 15;      // hand closer than this = open
const uint8_t       SAH_BERTURUT = 2;       // two readings in a row before believing it
const unsigned long SELANG_PING  = 60UL;    // gap between pings (old echoes must die down)
const unsigned long MASA_TAHAN   = 3000UL;  // lid stays open after the last detection
const unsigned long MASA_GERAK   = 600UL;   // time the servo needs to finish moving
const unsigned long HAD_ECHO_US  = 25000UL; // stop waiting for an echo after ~4.2 m

Servo servoTutup;

bool tutupTerbuka  = false;
bool servoAktif    = false;
uint8_t kiraDekat  = 0;

unsigned long pingTerakhir  = 0;
unsigned long kesanTerakhir = 0;
unsigned long mulaGerak     = 0;

// Send one burst and measure how long the echo takes to come back.
// Returning -1 means no echo at all within the time limit (clear path).
long bacaJarakCm() {
  digitalWrite(TRIG_PIN, LOW);
  delayMicroseconds(2);
  digitalWrite(TRIG_PIN, HIGH);
  delayMicroseconds(10);          // the 10 us trigger pulse the module asks for
  digitalWrite(TRIG_PIN, LOW);

  unsigned long tempoh = pulseIn(ECHO_PIN, HIGH, HAD_ECHO_US);
  if (tempoh == 0) return -1;

  // Sound travels ~343 m/s = 0.0343 cm per us, and that time covers
  // the trip out AND back, so divide by two.
  return (long)(tempoh * 0.0343 / 2.0);
}

// The servo is only attached while it needs to move, so it does not
// buzz and draw current the whole time the lid sits closed.
void gerakTutup(int sudut) {
  if (!servoAktif) {
    servoTutup.attach(SERVO_PIN);
    servoAktif = true;
  }
  servoTutup.write(sudut);
  mulaGerak = millis();
}

void setup() {
  Serial.begin(9600);

  pinMode(TRIG_PIN, OUTPUT);
  digitalWrite(TRIG_PIN, LOW);
  pinMode(ECHO_PIN, INPUT);

  gerakTutup(SUDUT_TUTUP);        // start in the closed position
  delay(MASA_GERAK);
  servoTutup.detach();
  servoAktif = false;

  Serial.println(F("Tong sampah automatik sedia."));
}

void loop() {
  unsigned long kini = millis();

  // 1. INPUT - one ping every SELANG_PING milliseconds.
  if (kini - pingTerakhir >= SELANG_PING) {
    pingTerakhir = kini;
    long jarak = bacaJarakCm();

    if (jarak > 0 && jarak <= AMBANG_CM) {
      if (kiraDekat < SAH_BERTURUT) kiraDekat++;
    } else {
      kiraDekat = 0;              // one far reading cancels the count
    }

    // 2. PROCESS - the decision is only made once a reading is confirmed.
    if (kiraDekat >= SAH_BERTURUT) {
      kesanTerakhir = kini;       // every confirmation refreshes the hold timer

      if (!tutupTerbuka) {
        tutupTerbuka = true;
        gerakTutup(SUDUT_BUKA);   // 3. OUTPUT
        Serial.print(F("Buka pada "));
        Serial.print(jarak);
        Serial.println(F(" cm"));
      }
    }
  }

  // Close again only after a full MASA_TAHAN with no confirmation.
  // Subtracting two unsigned longs stays correct even when millis() rolls over.
  if (tutupTerbuka && (kini - kesanTerakhir >= MASA_TAHAN)) {
    tutupTerbuka = false;
    kiraDekat = 0;
    gerakTutup(SUDUT_TUTUP);
    Serial.println(F("Tutup"));
  }

  // Release the servo once the lid has reached its place.
  if (servoAktif && !tutupTerbuka && (kini - mulaGerak >= MASA_GERAK)) {
    servoTutup.detach();
    servoAktif = false;
  }
}
The 60-millisecond gap between pings is no round number for looks: the previous burst is still bouncing around the room, and triggering too early lets the old echo arrive as a new reading. The detach() after the lid shuts stops the pulses — gravity holds the lid down, so the motor need not buzz and drain batteries while it waits.
How do you mount the servo and sensor on a real bin?
The SG90 servo is rated 1.3kg·cm of torque at 4.8V. Torque is force times radius, so on an arm 2cm from the shaft it can push about 0.65kg — plenty for a light plastic lid, and the reason an over-long arm goes weak.
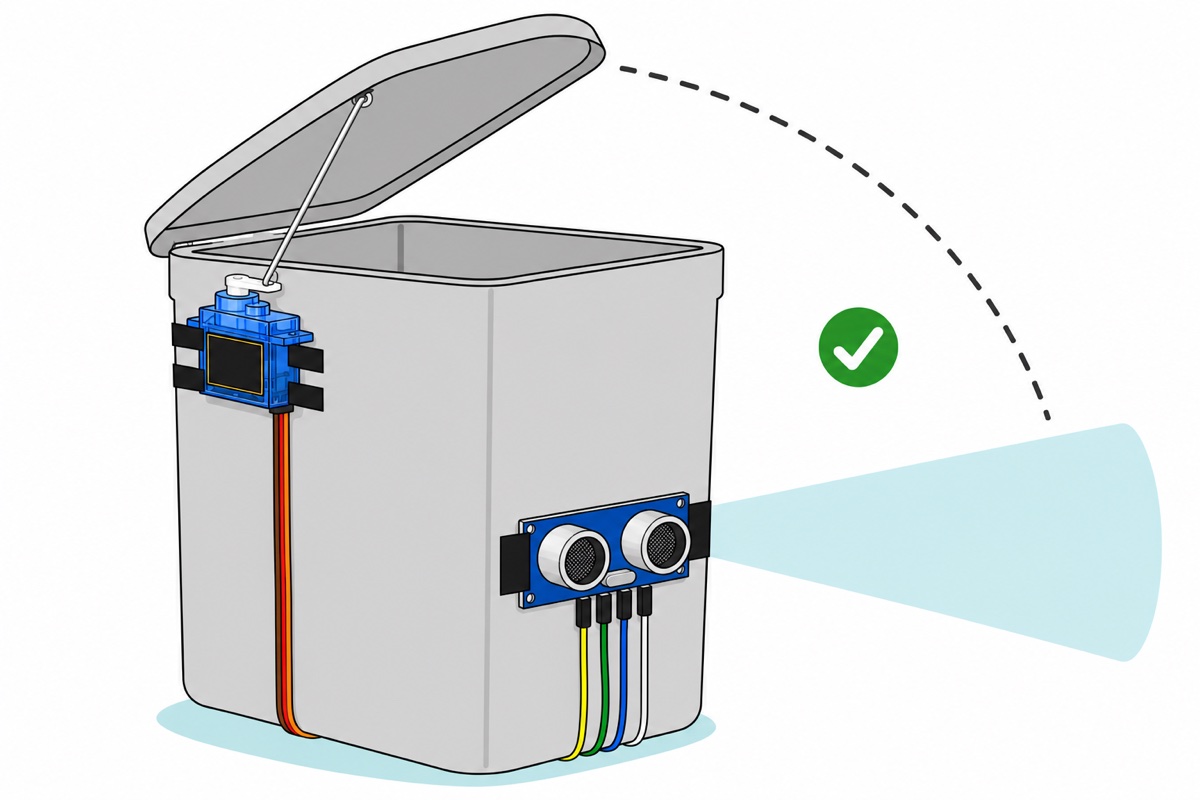
We sell this servo as the servo unit only — no horn or screws — so make your own arm from an ice-cream stick or stiff plastic strip: drill a hole slightly smaller than the splined shaft, press it on so the splines bite, and tape the boss so the arm cannot ride off. Upload the code first, fit the arm afterwards — the sketch drives the servo to SUDUT_TUTUP at power-up, so fit the arm with the lid closed; otherwise the servo pushes a shut lid, exactly the stall that produces the surge above. Link arm to lid with a straightened paperclip looped at both ends — the rod must pivot freely, since a dead-end joint locks up and stalls the servo. Mount the servo near the hinge; if it buzzes at the end of its swing, reduce SUDUT_BUKA.
Where the sensor sits decides whether the lid ever closes again. Mount the HC-SR04 on the bin’s front face pointing outward at hand height, and make sure it cannot see the lid when it is up. Stick the electrical tape to the board’s edges only; never cover the two silver cylinders’ mesh faces — that is where sound leaves and returns.
Seeing the arm and sensor actually mounted on a bin helps here:
Common mistakes we see
The servo wired to the Uno’s 5V pin. Cause number one of a juddering lid, jumping readings and a self-resetting board. Separate the supplies, join the grounds.
The sensor aimed at its own lid. The moment the lid rises it enters the detection cone, the sensor never stops reading close, and the lid stays open forever. Open the Serial Monitor: small readings with no hand present are the giveaway.
Using delay(3000) as the hold time. For those three seconds the Arduino is blind — it cannot see a returning hand, so the lid comes down onto it. A millis() timer solves it.
Buying a 360° servo. It spins instead of going to an angle, so the lid never stops in the right place. Pick the 180° option.
FAQ
What threshold distance suits an automatic dustbin?
15cm is a good starting point. The HC-SR04 cannot measure closer than 2cm, so too small a threshold is nearly unreachable; too large opens the lid whenever someone walks past. Change AMBANG_CM while watching the Serial Monitor.
Why does my lid keep opening and closing?
The hand is sitting right on the threshold line, so readings alternate between in and out of range. The MASA_TAHAN timer and the SAH_BERTURUT count exist for exactly that; raise MASA_TAHAN if it persists.
Can four AA batteries power the Arduino too?
Not through the VIN pin. The Uno’s recommended input is 7–12V and 6V is below that, so the 5V rail sags as the batteries weaken. Power the Uno over USB and let the AA pack run the servo alone.
Does the HC-SR04 need an extra library?
Not for the HC-SR04 — pulseIn() is already built into Arduino. The Servo library is Arduino’s own official one; if your IDE reports Servo.h: No such file or directory, open the Library Manager, search Servo, and install it once.
Is this project suitable for a Form 3 RBT folio?
Yes — its structure is input–process–output, and each block can be demonstrated separately. For other ideas with the same shape, see our list of RBT electronics projects.
Last updated August 2026. Stuck? Chat with us on WhatsApp.
