

Tutorials
Servo Motor 180° vs 270° vs 360°: Which Do You Need?
Jul
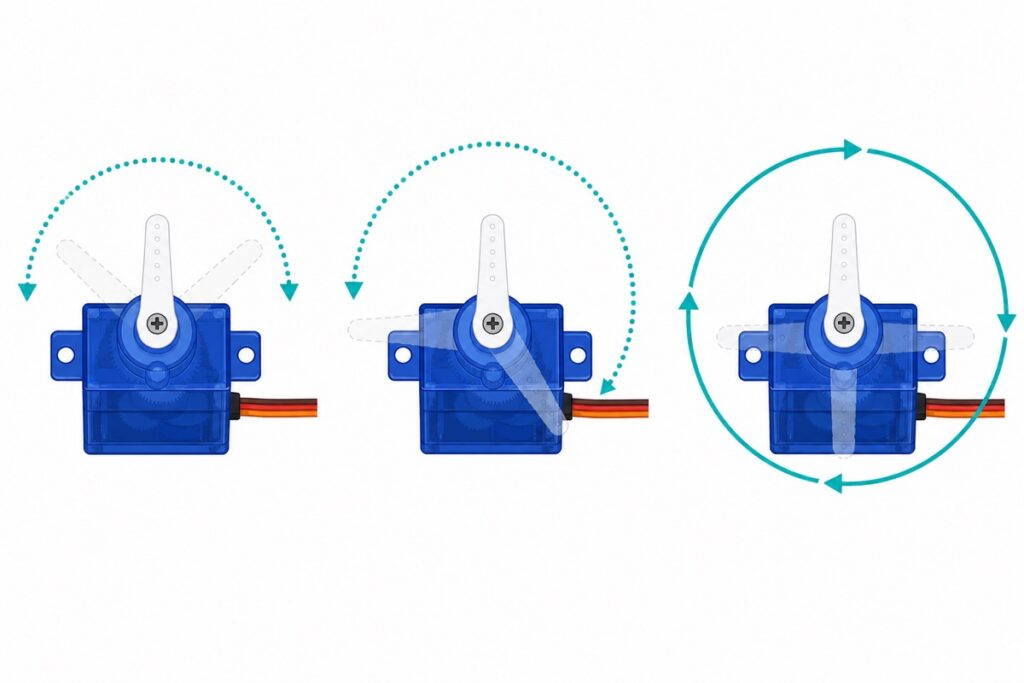
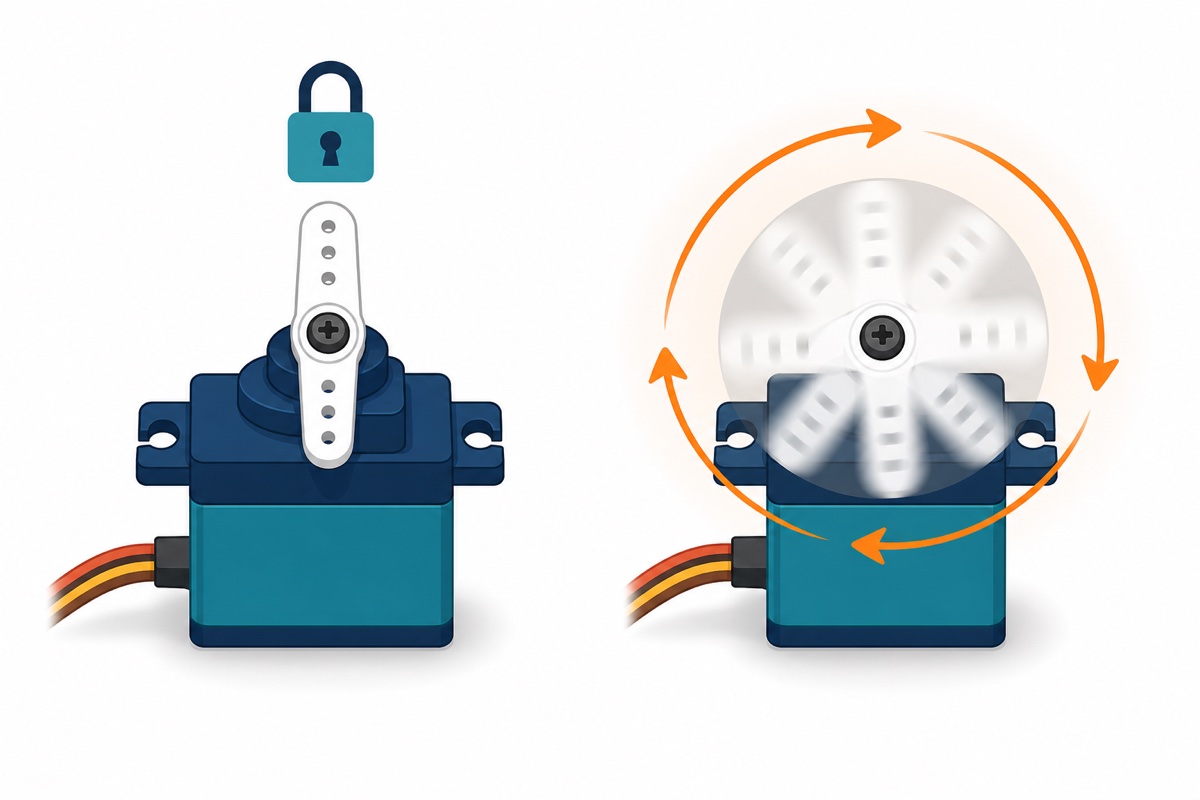
A 180° servo moves to the angle you command and holds it; a 360° (continuous) servo cannot hold an angle at all — its write() value controls speed and direction instead. A 270° servo is simply a positional servo with a wider sweep. All three look identical from the outside, so below is a 30-second sketch to tell them apart.
Why do 180°, 270° and 360° servos look exactly the same?
Because the case, the three-wire lead and very often the product name are identical — only the variant differs. “Servo motor 180 vs 360 — what’s the difference?” is the single most common servo question our support team handles, and it regularly turns into “wrong item” complaints where the servo was actually behaving exactly as designed.
The difference is entirely internal. A positional servo (180° or 270°) can find and hold a commanded angle. A continuous-rotation servo has that ability removed — it behaves like a gear motor with a servo plug. You cannot tell them apart by looking; you tell them apart by testing.
The servos in this guide
 SG90 MG90 Tower Pro Micro Servo Motor 9g 180 360 Servo Motor for Arduino Robotic - SG90- 180°
 SG90 MG90 Tower Pro Micro Servo Motor 9g 180 360 Servo Motor for Arduino Robotic - SG90- 360°
 SG90 MG90 Tower Pro Micro Servo Motor 9g 180 360 Servo Motor for Arduino Robotic - MG996R- 180°
What is the real difference between a 180°, 270° and 360° servo?
Everything comes down to what write() does inside the servo. Here is the whole story in one table.
| Behaviour | 180° servo | 270° servo | 360° continuous servo |
|---|---|---|---|
| Type | Positional | Positional, wider range | Not positional (continuous rotation) |
What write(angle) does |
Moves to that angle (0–180) and holds it | Moves to a point mapped across the wider 270° sweep and holds it | Sets speed and direction: ≈90 = stop, toward 0 = full speed one way, toward 180 = full speed the other |
| Can it hold a commanded angle? | Yes | Yes | No — it keeps rotating |
| Typical projects | RC steering, robot arm joints, camera pan | Same jobs as 180°, when you need a wider sweep | Wheels, winches, pulling a line |
| Think of it as | A dial you point | A dial with more travel | A gear motor with a servo plug |
So a 360° servo is not an “upgraded” 180° — it is a different tool. If your project needs the horn to stop at a specific angle, a continuous servo can never do it.
How do I test which servo I actually have?
Upload this sketch, power the servo, and watch what happens. It commands the 90° centre position — the one value where the two servo families behave completely differently.
// Servo identification test - Arduino Uno/Nano
// Positional (180/270): moves to centre and HOLDS firm.
// Continuous (360): STOPS, or creeps slowly.
#include <Servo.h>

Servo testServo;

void setup() {
  testServo.attach(9);   // orange/yellow signal wire to pin 9
  testServo.write(90);   // command the 90-degree centre position
}

void loop() {
  // Nothing to do here - just watch the servo:
  // Swings to the middle and holds      = positional (180 or 270)
  // Sits still, or drifts very slowly   = continuous 360
}
If a continuous servo drifts slightly at 90 instead of stopping dead, gently turn the small trim potentiometer on the servo body (if present) until it sits still. That is calibration, not a defect.
Which servo do you actually need?
Choose 180° or 270° when you need position
RC steering, robot arm joints and camera pan brackets all need the servo to go to an angle and stay there — that is positional territory, so pick the SG90 180° micro servo for light mechanisms. Reach for 270° only when 180° of travel is not enough.
Our jemuran automatik with rain sensor tutorial is a good worked example of servo control in a real Malaysian project.
Choose 360° continuous when you need rotation
Robot wheels, winches and anything that pulls a line want continuous rotation — that is the SG90 360° continuous servo. Remember the control logic flips: you are commanding speed, not angle.
// Continuous (360) servo demo - write() = speed + direction
#include <Servo.h>

Servo wheel;

void setup() {
  wheel.attach(9);
}

void loop() {
  wheel.write(0);     // full speed in one direction
  delay(2000);
  wheel.write(90);    // about 90 = stop
  delay(1000);
  wheel.write(180);   // full speed the other direction
  delay(2000);
  wheel.write(90);    // stop again
  delay(1000);
}
SG90 or MG996R? Pick by load, not by looks
The SG90 is a 9g micro servo with plastic gears, made for light loads — sensor brackets, small linkages, school RBT projects. The MG996R has metal gears and much higher torque, which is what you want for heavier robot arms. If the mechanism feels heavy in your hand, the SG90’s plastic gears are the part that will complain first.
How do you wire and power a servo correctly?
All three servo types share the same three-wire hobby connector, so the wiring never changes — only the code does.
| Wire colour | Connects to | Note |
|---|---|---|
| Brown / black | GND | Must be shared with the Arduino GND |
| Red | 5V supply | Use a proper 5V source under load, not the Arduino 5V pin |
| Orange / yellow | Signal | Any digital pin — Servo.h does not need a hardware-PWM pin. Pin 9 is just the classic choice |
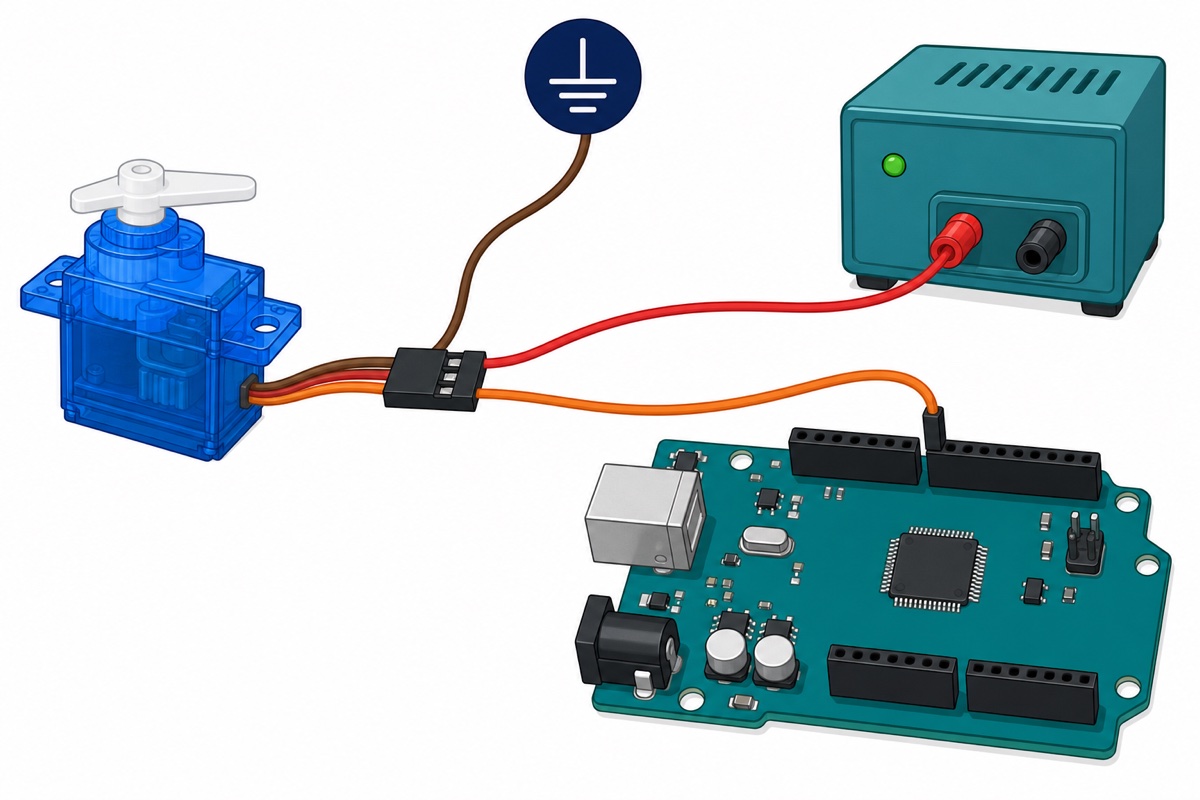
The power line matters more than beginners expect. Under load, a servo fed from the Arduino’s 5V pin causes jitter and random board resets — power it from a dedicated 5V supply and share only the ground. An adjustable module dialled in does this well; see our guide on adjusting an LM2596 buck converter to 5V.
Common mistakes we see from real customers
“Mcm mana nak beza servo motor 180° dan 360° eh, sbb nama dua-dua sama ja yang saya terima” — Correct observation: the printed name is often identical, and the case gives nothing away. The fix is the 90° test sketch above. Positional holds the centre; continuous stops or creeps. Thirty seconds and you know.
“If I need to use a servo for RC, which one?” — For RC steering you need positional control, so 180° (or 270° if you want a wider sweep). A continuous servo on a steering linkage would just keep spinning past centre — save the 360° for drive wheels and winches.
One customer was sure we had shipped the wrong item: their “180° servo” just kept rotating and never held an angle. It was a continuous-rotation variant doing exactly what it was designed to do — the order simply had the other variant selected. Before opening a dispute, check the variant on your order and run the test sketch; the servo is usually innocent.
FAQ
How do I tell a 180° and a 360° servo apart without a label?
Run a sketch that commands write(90). A positional servo swings to centre and holds firm; a continuous servo stops still or drifts slowly. That single test settles it.
Can a 360° continuous servo hold a position?
No. Its write() value only sets speed and direction, so it physically cannot park at a commanded angle. If your project needs a held angle, use a 180° or 270° positional servo.
Which servo should I use for RC steering?
A positional one — 180° for most builds, 270° if the mechanism needs a wider sweep. Continuous servos are for wheels and winches, not steering.
Why does my servo jitter or my Arduino keep resetting?
Almost always power. A loaded servo drawing from the Arduino’s 5V pin causes exactly these symptoms. Feed it from a proper external 5V supply and connect the grounds together.
Do I code a 270° servo differently from a 180°?
Same Servo.h, same write() calls. The difference is that the command range is mapped across the wider 270° sweep, so each step of write() covers more physical travel.
Last updated July 2026. Stuck? Chat with us on WhatsApp.
