

Tutorials
DHT11 vs DHT22: Which Humidity Sensor Should You Buy?
Sep
Buy the DHT22 if the air you are measuring ever goes above 90 %RH or below 0 °C — in Malaysia that covers almost anything outdoors, in a bathroom or in a grow box. Indoors, the DHT11 is genuinely enough. Both run on the same three connections and the same library, so changing your mind later costs one word in one line of code.
What actually separates the DHT11 from the DHT22?
The DHT11 and the DHT22 — which Aosong also sells as the AM2302 — are one design built to two grades: a humidity-sensitive capacitor, a temperature element and a microcontroller that converts both and sends a finished number down one wire. The figures below are Aosong’s datasheet claims, not measurements of ours. If you are weighing up three names, there are only two parts: DHT22 and AM2302 are the same sensing element under one datasheet, and AM2302 is the number Aosong usually prints on the pre-wired and carrier-mounted versions — which is what a 3-pin module is.
| Datasheet claim | DHT11 | DHT22 / AM2302 |
|---|---|---|
| Humidity range | 20–90 %RH | 0–100 %RH |
| Humidity accuracy | ±5 %RH | ±2 %RH (max ±5 %RH) |
| Humidity step | 1 %RH | 0.1 %RH |
| Temperature range | 0 to 50 °C | −40 to 80 °C |
| Temperature accuracy | ±2 °C | ±0.5 °C |
| Temperature step | 1 °C | 0.1 °C |
| Supply | 3.3–5.5 V | 3.3–6 V |
| Minimum interval between reads | 2 s | 2 s |
The step row is structural, not a rounding choice. Both sensors send exactly 40 bits: two bytes of humidity, two of temperature, one checksum. In the DHT11 frame the second byte of each pair is the decimal part, and Aosong’s own worked example notes it is always zero — so a DHT11 cannot report 65.3 %RH, only 65. The DHT22 spends those same two bytes as one 16-bit number in tenths, and 0.1 falls out of that.
Parts to try this — pick ONE sensor, not both
 DHT 11 DHT 22 Temperature and Humidity Sensor DHT22 High Sensitivity Sensor DHT11 For Aduino IOT - DHT11 SENSOR
 DHT 11 DHT 22 Temperature and Humidity Sensor DHT22 High Sensitivity Sensor DHT11 For Aduino IOT - DHT22 SENSOR
 Arduino Uno Compatible SMD UNO R3 with Type B Cable - ATMEGA328P with CH340G-Microcontroller Project
 40pcs Dupont Wire 10cm 20cm 30cm for Breadboard DIY Experiment Jumper Wire Breadboard wire - DUPONT WIRE M-F 20CM
Both sensors live on one product page, so choose DHT11 SENSOR or DHT22 SENSOR in the dropdown before adding to cart. The male-to-female jumpers run straight from the module's pins into the Uno's sockets, so nothing else is needed.
Only if you want it on a breadboard
 MB102 Breadboard 170 400 830 Holes Breadboard Donut Board Arduino Prototype Multi Color - MINI BREADBOARD 170 HOLES (WHITE)
 40pcs Dupont Wire 10cm 20cm 30cm for Breadboard DIY Experiment Jumper Wire Breadboard wire - DUPONT WIRE M-M 20CM
The mini breadboard and the M-M jumpers are the alternative route, for when the sensor has to share a 5V line with something else.
Which one does Malaysian air force you into?
The DHT11’s specified humidity ceiling of 90 %RH decides most of these purchases here. MET Malaysia puts the country’s maximum daily average relative humidity at over 94%, and says it “may reach as high as 100%”. Overnight and after rain, the air outside your window sits above the DHT11’s top figure.
Past that ceiling the DHT11 does not fail loudly. It is outside the range its factory calibration was fitted over, and Aosong publishes no accuracy figure beyond it — the ±5 %RH on the spec sheet simply stops applying, while the reading still arrives looking perfectly reasonable. A plausible number you cannot trust is worse than an obviously broken one. Aosong names a second cost too: working outside the stated range accelerates the sensor’s aging.
Temperature draws the line at the bottom. The DHT11 starts at 0 °C, so a fridge logger or a freezer alarm gets no valid readings from it at all. Indoors both sensors sit well inside range, and ±2 °C is fine for deciding when a fan should come on.
- DHT11: indoor room monitors, school and RBT projects, anything that triggers a fan at a threshold.
- DHT22: outdoors, balconies, greenhouses, bathrooms, incubators, grow boxes, fridges, and any log you mean to plot over weeks.
- Neither: if you only need temperature, or the probe gets wet, a waterproof DS18B20 has no humidity element to ruin.
Several sensors reading one room, so an accuracy figure becomes something you can see:
Where does the pull-up resistor live — the module or your breadboard?
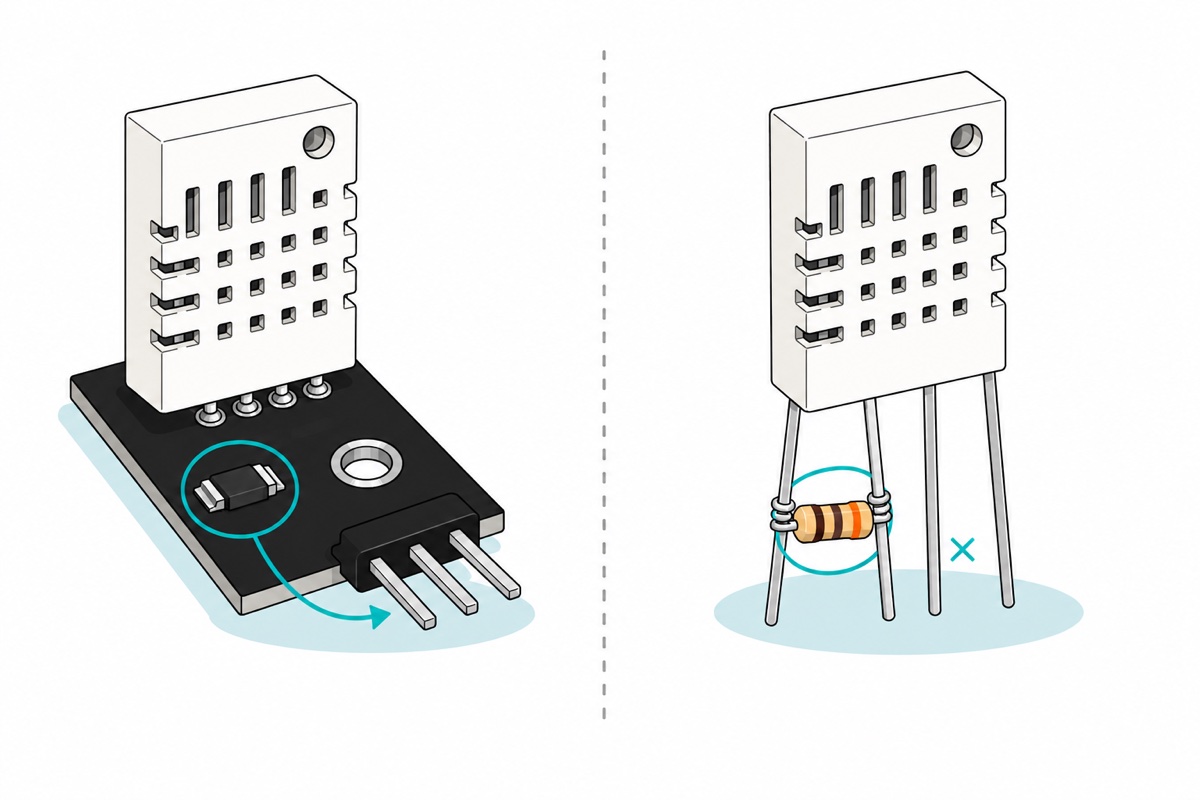
The DHT’s single data line is an open-drain bus: neither end ever drives it high. Both can only pull it down to ground and then release, and a resistor to VCC is the only thing that pulls it back up. With nothing pulling it up, releasing does nothing — the line floats, the sensor’s low pulses never produce matching high edges, and the library times out. Hence nan on every read from the first one.
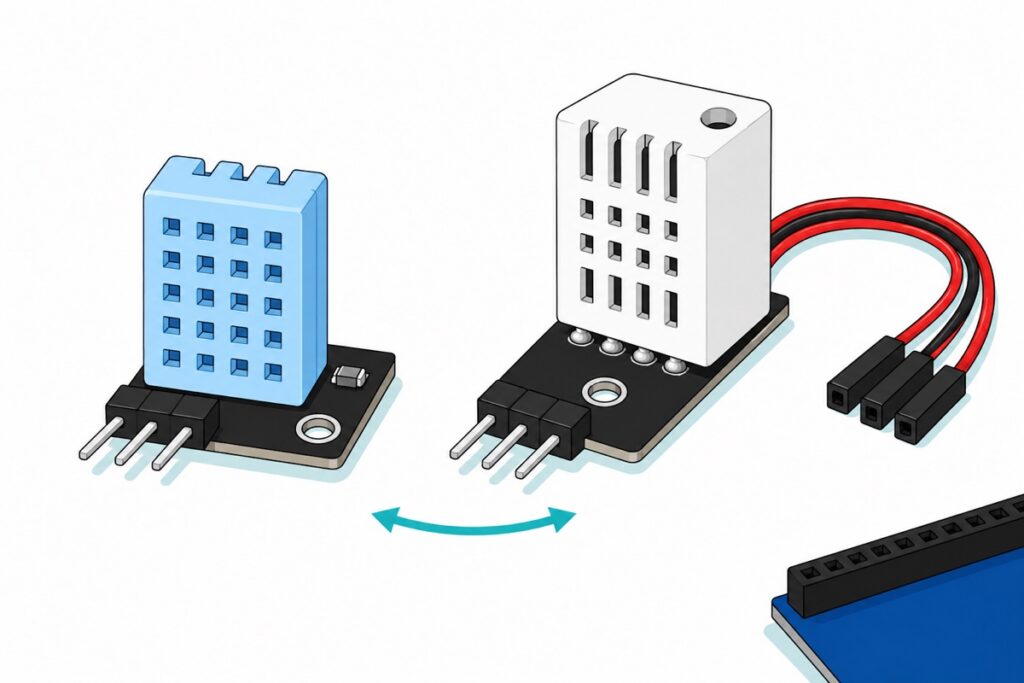
That is the whole difference between the 3-pin module and the bare 4-pin sensor, and why both of our variants are modules. The DHT11 module shows its working: an SMD resistor at R1 marked 512, which decodes as 5.1 kΩ — the value in Aosong’s own typical application circuit. The DHT22 module does the same job around the white AM2302: its carrier holds the pull-up and leaves off the sensor’s unused third leg, so a four-pin part reaches you as three pins that plug straight in. Buy bare and both are yours to sort out. Hold the four-legged part with the vented face towards you and count the legs left to right: leg 1 is VCC, leg 2 is data, leg 3 goes nowhere inside the sensor, leg 4 is GND. The pull-up bridges leg 2 to leg 1 — 5.1 kΩ or 10 kΩ — and leg 3 stays empty.
The trap in between is why people believe the resistor is optional. Adafruit’s library switches the pin to INPUT_PULLUP while reading, enabling the ATmega328P’s internal pull-up — 20 kΩ to 50 kΩ. On a 10 cm lead a bare sensor often works on that alone. But rise time is resistance times the wire’s capacitance, so a 30 kΩ pull-up charges the same wire about six times slower than a 5.1 kΩ one, and the sensor’s shortest pulse lasts 26 µs. Add cable and the reads turn intermittent.
Why do the readings come back as nan, or freeze on one number?
The DHT library returns nan when no valid 40-bit frame arrived — a report of silence, not a sensor value. A frozen number is the opposite problem with a different cause. Four things account for nearly all of both.
| What you see | What is happening | Fix |
|---|---|---|
| The same number every loop, changing only once every two seconds | You asked for a reading sooner than the library will fetch one, so it handed back the cached previous result | Leave 2 s between reads |
| nan on every single read, from the first | No pull-up on a bare sensor, the data wire on the wrong pin, or DHT22 declared with a DHT11 plugged in | Check the wire, then the constructor |
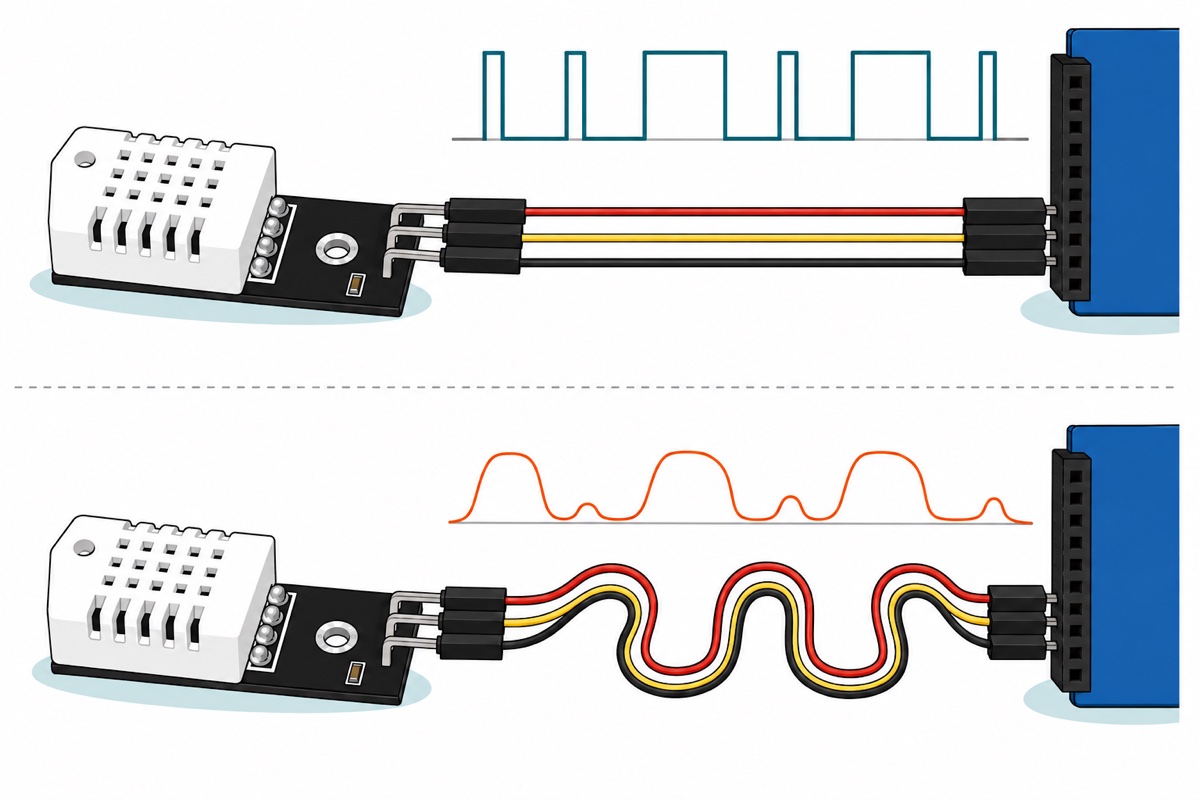
| nan mixed with good readings, at random | Slow edges — long or unshielded cable, a weak pull-up, or 3.3 V logic | Shorten the run, 5.1 kΩ pull-up |
| Numbers that are present, steady and absurd | DHT11 declared with a DHT22 plugged in; the frame is decoded by the wrong rule | Correct the type in the constructor |
The frozen number needs spelling out, because nothing warns you. Adafruit’s DHT library defines a minimum interval of 2000 ms; asked sooner, it returns the previous result without talking to the sensor at all. A loop with delay(200) therefore gives ten identical numbers, then a new one. It is also why the widely repeated “the DHT11 does one reading per second” is a bad thing to act on: Aosong’s DHT11 datasheet says the interval of the whole process must be beyond 2 seconds, exactly as the DHT22 does.
Long cable runs fail at the bit. Each bit begins with a 50 µs low, then a high whose length is the data: 26–28 µs is a zero, 70 µs is a one, and the Arduino decides by timing that high. Cable capacitance rounds the rising edge, so the line crosses the logic threshold late and every high measures short. Far enough and a one reads as a zero, the checksum fails, and you get nan. Aosong rates 20 m of cable with the 5.1 kΩ pull-up, and caps it at 100 cm on 3.3 V — that second limit is volt drop along the wire rather than edge rounding, but it points the same way: keep the run short.
The wrong sensor type fails asymmetrically, which is what makes it confusing. The library holds the line low 20 ms to start a DHT11 and only 1.1 ms to start a DHT22. Declare DHT22 with a DHT11 plugged in and 1.1 ms is far below the 18 ms minimum the DHT11 needs to notice you — constant nan. Declare DHT11 with a DHT22 plugged in and the long start still works, but the frame is split the DHT11 way: a real 65.3 %RH is sent as 653, whose two bytes are 2 and 141, which the DHT11 rule reads as 2 + 14.1 = 16.1 %RH. The checksum passes, so nothing complains.
How do you wire one up and prove it works?
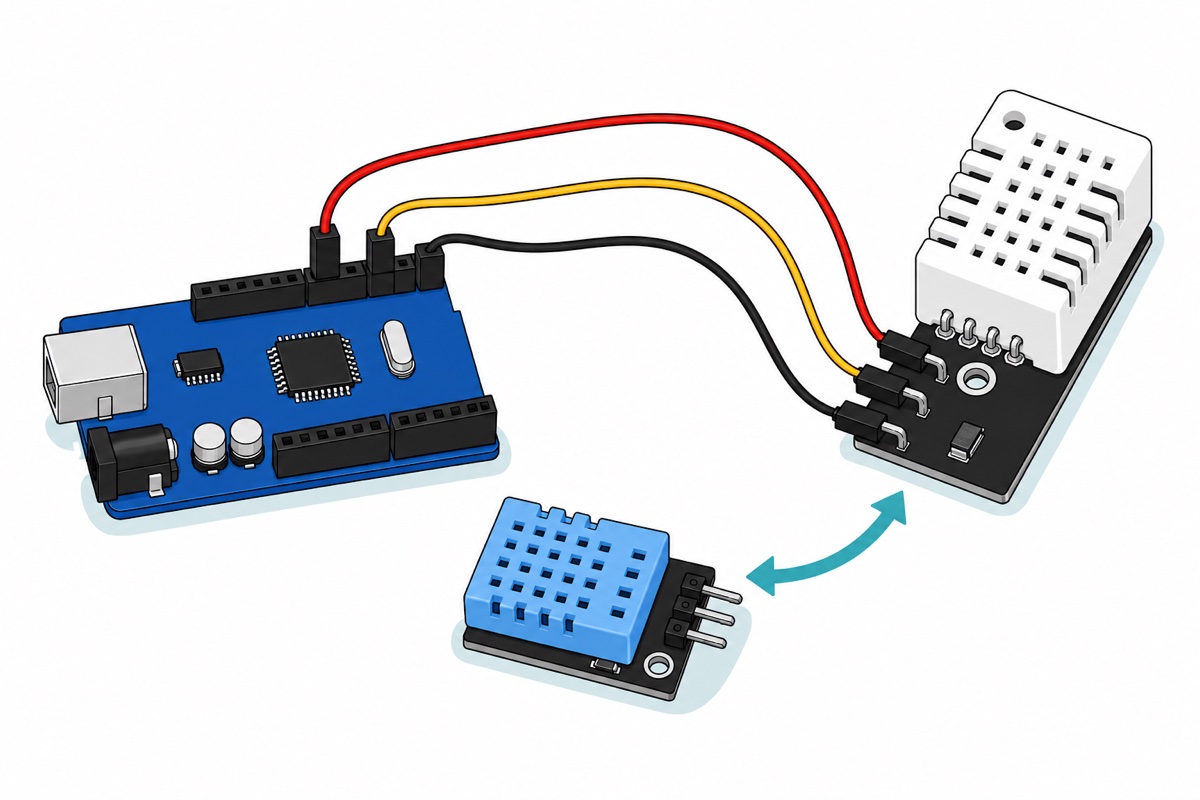
The DHT11 and DHT22 modules both end in a 3-pin right-angle male header, and the Uno‘s sockets are female, so three male-to-female jumpers are the whole wiring job. Read the silkscreen beside the header rather than counting from an edge, because the two carriers do not print the same order. The DHT11 board reads S, VCC, − with the data pin at the S end; the DHT22 board reads +, out, − with the data pin in the middle. Only the − pin is in the same place on both — VCC and data trade seats.
| Module pin (read the silkscreen) | Uno socket | Why |
|---|---|---|
| + (VCC) | 5V | Both sensors are specified from 3.3 V, so a 5V rail sits comfortably inside range |
| − (GND) | GND | The shared reference — every pulse width is measured against it |
| S or out (data) | D2 | Any digital pin works; D2 is simply what the sketch below names |
On a 3.3 V board — an ESP32 or an ESP8266, like the one in our OLED monitor build below — take the module’s + from the 3V3 pin and not from 5V. Both sensors are specified down to 3.3 V, so they read perfectly well there, and the reason the rail matters is that the data line idles at whatever voltage you feed +: powered from 5V, the module hands 5 V to a GPIO that is not rated for it. What you give up is supply margin — less room for volt drop along the wire before the sensor is under-fed — which is why the 100 cm cable limit above belongs to 3.3 V and the 20 m one to 5 V.
The sketch needs Adafruit’s DHT sensor library. In the Arduino IDE open Tools → Manage Libraries, search DHT sensor library, install the Adafruit one, and accept when it offers Adafruit Unified Sensor — the DHT library will not compile without that dependency.
// Read a DHT11 or a DHT22 and print both values once every two seconds.
// To change sensor, edit ONE line: DHT22 -> DHT11. Nothing else moves.
#include <DHT.h>

const uint8_t DHT_PIN = 2;   // the module's S / out pin
#define DHT_TYPE DHT22       // <-- DHT11 for the blue sensor, DHT22 for the white one

DHT dht(DHT_PIN, DHT_TYPE);

void setup() {
  Serial.begin(9600);
  dht.begin();
  delay(2000);               // let the sensor finish its first conversion undisturbed
}

void loop() {
  float rh    = dht.readHumidity();
  float tempC = dht.readTemperature();

  if (isnan(rh) || isnan(tempC)) {
    // nan means the 40-bit frame never arrived, or arrived with a bad checksum.
    Serial.println(F("no reading - check the data wire, the pull-up and DHT_TYPE"));
  } else {
    Serial.print(tempC, 1);
    Serial.print(F(" C   "));
    Serial.print(rh, 1);
    Serial.println(F(" %RH"));
  }

  delay(2000);               // Aosong: the whole read cycle must stay beyond 2 seconds
}
Open the Serial Monitor at 9600 baud and a line should appear every two seconds. That DHT_TYPE line is the swap this article turns on: compiled for an Uno either way, the sketch is the same 5,184 bytes. Starting with the cheaper sensor is a decision, not a bet — as long as you re-seat the three jumpers against the new board’s silkscreen when you swap, because the two carriers do not put the data pin in the same place.
Both sensors wired and running, if you would rather watch the swap:
Our DHT11 and OLED monitor build puts those numbers on a screen; to work on a mini breadboard instead, our breadboard guide explains which holes are joined.
Common mistakes we see from real customers
Reading in a tight loop to make a display feel responsive. It does the opposite: anything faster than two seconds returns the cached number, so the screen updates smoothly with stale data.
Buying the DHT11 for an outdoor or bathroom logger because the numbers “look about right”. They will — above 90 %RH the DHT11 is outside the range its ±5 %RH accuracy is specified over, and an unspecified number still looks like a number. Plausible is not correct, and this is the one case where the extra ringgit buys something real.
Mounting the sensor in the same box as the thing it is watching. Aosong asks for it to sit far from anything that changes the local temperature; because relative humidity is defined against temperature, a warm regulator skews both readings at once.
Moving the jumpers straight across when you swap sensors. The two carrier boards do not share a pinout: data sits at the S end of the DHT11 board and in the middle of the DHT22 board, and only − is in the same place. Carry the DHT11’s wiring over unchanged and the Uno’s 5V lands on the DHT22’s data pin while D2 lands on its supply pin — a quick way to kill a sensor. Pull all three jumpers and re-seat them against the silkscreen every time you change sensor.
FAQ
What is the real difference between the DHT11 and the DHT22?
Range and resolution, not reliability. Aosong specifies the DHT11 at 20–90 %RH and 0–50 °C, ±5 %RH and ±2 °C in whole-number steps; the DHT22 at 0–100 %RH and −40 to 80 °C, ±2 %RH and ±0.5 °C in steps of 0.1. Wiring, protocol and library are identical, and both want two seconds between readings.
Why does my DHT22 keep returning nan?
nan means no valid 40-bit frame arrived. If it happens on every read, suspect the data pin, a missing pull-up on a bare 4-pin sensor, or the wrong type in the constructor. If good readings and nan alternate, frames are arriving damaged — shorten the cable and fit a 5.1 kΩ pull-up.
How do I test a DHT22 sensor?
The DHT22 carrier’s pinout reads +, out, − across the header, so the data pin is the middle one. Wire + to 5V, − to GND and out to D2, load the sketch above, and open the Serial Monitor at 9600 baud. A line every two seconds means the sensor is talking. Breathe gently on it: the humidity should climb and fall back slowly, which shows the sensing element is alive and not just the checksum.
Can I calibrate a DHT11 or a DHT22?
Not in any real sense. Each sensor is calibrated at the factory and its coefficients are burned into on-chip memory, which it consults on every reading. What Aosong publishes instead is a recovery procedure for a sensor left in saturated air: a spell at 50–60 °C below 10 %RH, then several hours at 20–30 °C above 70 %RH. A saturated-salt jar is a fair sanity check, not an adjustment you can write back.
What is the difference between the DHT22 sensor and a DHT22 module?
The bare sensor is the four-legged white part on its own, and you supply the pull-up between the data leg and VCC. The module is that same part on a carrier board that already has the resistor and drops the sensor’s unused third leg, which is why it comes out as three pins. Same sensor; the module is the one you can plug in.
Last updated September 2026. Stuck? Chat with us on WhatsApp.
